Placeholder Content Image

Art expert fired over gross underestimation of artefact

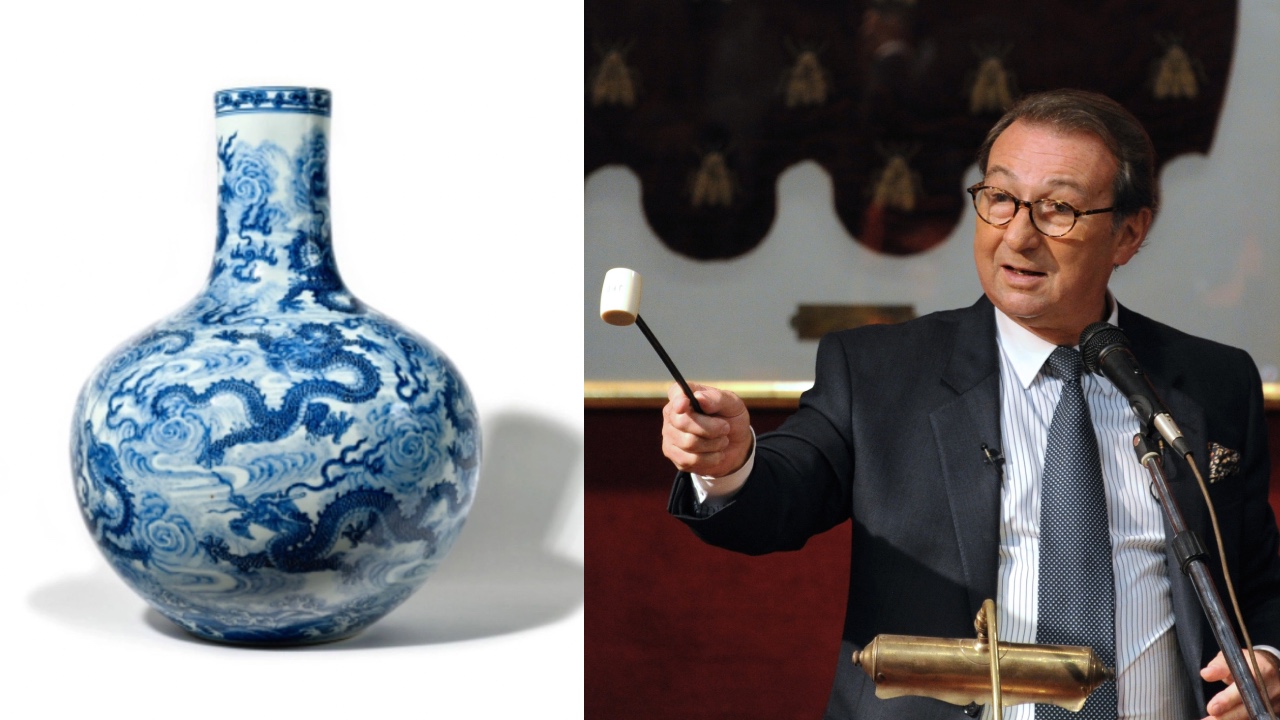
<p dir="ltr">A French art expert has been fired after grossly undervaluing a Chinese vase at 4,000 times less than its sale price.</p> <p dir="ltr">The vase in question, which was originally estimated at €2,000 ($3,119 AUD), sold for €9 million ($14,000,000 AUD) at French Osenat auction in Fontainebleau house in early October.</p> <p dir="ltr">The original estimate reflected the expert’s view that it was a 20th-century decorative piece, however buyers suspected that it might date back further to the 18th-century.</p> <p dir="ltr">Despite the date discrepancy, it is still unclear as to what drove the price so much higher. </p> <p dir="ltr">“The expert made a mistake. One person alone against 300 interested Chinese buyers cannot be right,” auction house president Jean-Pierre Osenat told T<a href="https://www.theguardian.com/world/2022/oct/07/why-chinese-vase-valued-at-euros-2000-sold-for-euros-8m-france">he Guardian</a> last week. </p> <p dir="ltr">“He was working for us. He no longer works for us. It was, after all, a serious mistake.”</p> <p dir="ltr">The anonymous seller found the Chinese ‘Tianqiuping’ style vase while clearing out her mother’s estate. </p> <p dir="ltr">While the dragon and cloud motif is greatly sought after among Asian collectors, some believe to have spotted a stamp belonging to 18th-century Chinese emperor Qianlong on the vase.</p> <p dir="ltr">“We don’t know whether [the vase] is old or not or why it sold for such a price,” explained Cédric Laborde, the director of the auction house’s Asian arts department. </p> <p dir="ltr">“The valuation corresponded to what the expert thought. In China, copying something, like an 18th-century vase, is also an art.”</p> <p dir="ltr">The unnamed and now-fired expert is reportedly standing by his original valuation of the Chinese vase.</p> <p dir="ltr"><em>Image credits: Getty Images / Osenat</em></p>

Art

Placeholder Content Image

7 tips to make fresh flowers last longer

<p>It’s always such a nice treat to have fresh flowers in the house – whether they’ve been bought for you by a special someone, you’ve treated yourself, or you’ve just cut them straight from your very own garden. But many people don’t know the correct way to look after a bunch of flowers to ensure they get to enjoy their beauty for as long as possible. So here are some simple tips to remember.</p> <ol> <li>Start with the right kind of vase. Don’t try to cram too many flowers into a small vase – make sure the flowers have room to open fully so you can see as much of them as possible.</li> <li>Remove any low-hanging leaves. You don’t want any leaves to be sitting in the water, so be sure to prune them before putting your bouquet into your vase.</li> <li>Change the water daily. Flowers don’t like to sit in the same water day after day.</li> <li>Trim the stems. Every few days, trim the stems a little, cutting at an angle.</li> <li>Keep the flowers away from direct heat and sunlight. A room that is too warm will lead to wilted flowers, so be sure to choose somewhere that stays cool if possible. If you really want to stretch things, consider keeping the flowers in your fridge when you’re not in the house.</li> <li>When flowers start to wilt, remove any that don’t look so hot and transfer the bouquet to a smaller vase to freshen things up.</li> <li>If you’re left with just one or two late-opening blooms, you can float it in a decorative teacup full of water.</li> </ol> <p><em>Image: Getty</em></p>

Home & Garden

Placeholder Content Image

11 great ways to transform a plain vase

<p>If you are the owner of a few plain glass vases why not give them a new lease on life with these simple ideas.</p> <p><strong>Gold star</strong></p> <p>Paint a glue or adhesive onto a vase and then attach sheets of gold leaf.</p> <p><strong>Colour blocking</strong></p> <p>Use thick or thin tape to make interesting shapes and patterns on the vase. Then paint each section a different colour from a simple theme (beachy greens and blues, hot reds and orange). Once dry, peel off the tape to reveal the final look.</p> <p><strong>Paper tree</strong></p> <p>Collect soft bark from a paper tree and use a hot glue gun to attach it onto a vase to completely cover the glass.</p> <p><strong>Tied up</strong></p> <p>Use thin rope or string to make patterns by tying around the vase. Tip the vase upside down and work from the bottom to the top, using a hot glue gun to finish off the design.</p> <p><strong>Chalk messages</strong></p> <p>Buy some blackboard paint and add a square or circle to your vase. Add your flowers and any message that you like. A great gift idea.</p> <p><strong>Graduated theme</strong></p> <p>Using high gloss acrylic paint you can make an ombre pattern, going from darker on the bottom to lighter at the top.</p> <p><strong>Ribbon look</strong></p> <p>Another simple idea using tape. Use thicker tape to make a windy pattern on the vase, then use gold spray paint. Once dry, carefully remove the tape.</p> <p><strong>Internal shimmer</strong></p> <p>Use an adhesive to attach sparkly glitter to the inside of your vase.</p> <p>This effect looks great in a group of three.</p> <p><strong>Textured white</strong></p> <p>Grab some puffy paint and add spots to create this eye-catching pattern. Once dry, cover with white acrylic paint.</p> <p><strong>Colour dipping</strong></p> <p>Place a rubber band around your glass vase and then carefully paint a pastel paint on the bottom for a dipped look.</p> <p><strong>Confetti time</strong></p> <p>Grab an artist’s palette and add lots of different coloured blobs of paint. Then use a toothpick to select a colour and make your own confetti style pattern on your vase.</p> <p>If you try and of these great ideas, we’d love to hear how you get on in the comments section.</p> <p><strong>Related links:</strong></p> <p><a href="/lifestyle/home-garden/2016/06/how-to-stamp-and-stencil-napkins/"><span style="text-decoration: underline;"><em><strong>How to stamp and stencil napkins</strong></em></span></a></p> <p><a href="/lifestyle/home-garden/2016/05/easy-diy-vases/"><span style="text-decoration: underline;"><em><strong>12 DIY vases that are easy to make</strong></em></span></a></p> <p><a href="/lifestyle/home-garden/2016/03/ways-to-repurpose-old-picture-frames/"><span style="text-decoration: underline;"><em><strong>12 ways to repurpose old picture frames</strong></em></span></a></p>

Home & Garden

Placeholder Content Image

12 DIY vases that are easy to make

<p>It’s so nice to have fresh flowers in your home, but it’s easy to find yourself without enough vases to go around – especially if it’s your birthday or another special occasion.</p> <p>So why not turn your hand at making your own? You don’t need a potter’s wheel or any specific skills. Just some time, patience and a little creativity.</p> <p>1. <span style="text-decoration: underline;"><strong><a href="http://www.brit.co/patterned-bud-vases/" target="_blank">Paint Pen Patterned Vases</a></strong></span>: Grab some brightly coloured paint pens and let your inner creative loose on these white vases. (via <span style="text-decoration: underline;"><strong><a href="http://www.brit.co/patterned-bud-vases/" target="_blank">Brit + Co.</a></strong></span>)</p> <p>2. <span style="text-decoration: underline;"><strong><a href="http://www.abubblylife.com/2013/03/diy-paper-bag-flower-vase.html" target="_blank">Triangle Flower Bags</a></strong></span>: There’s something sweet about a glass jar full of flowers, wrapped in a decorated brown paper bag. Perfect for making your own themed decorations for a baby shower or afternoon tea. (via <strong><span style="text-decoration: underline;"><a href="http://www.abubblylife.com/2013/03/diy-paper-bag-flower-vase.html" target="_blank">A Bubbly Life</a></span></strong>)</p> <p>3. <span style="text-decoration: underline;"><strong><a href="http://www.katescreativespace.com/2013/06/21/think-pink-painted-bottle-vases/" target="_blank">Ombre Painted Floral Bottles</a></strong></span>: A great option if you want a big hit of colour in your home. Ombre is a graduated colour scheme, and is quite easy to do yourself.(via <span style="text-decoration: underline;"><strong><a href="http://www.katescreativespace.com/2013/06/21/think-pink-painted-bottle-vases/" target="_blank">Kate’s Creative Space</a></strong></span>) </p> <p>4. <span style="text-decoration: underline;"><strong><a href="http://www.brit.co/diy-floppy-disk-planters/" target="_blank">Floppy Disk Planters</a></strong></span>: For a fun gift for an office pal, grab some old floppy disks and make these planters. Add a succulent, as they don’t need much water and will enjoy a long life indoors. (via <span style="text-decoration: underline;"><strong><a href="http://www.brit.co/diy-floppy-disk-planters/" target="_blank">Brit + Co.</a></strong></span>) </p> <p>5. <span style="text-decoration: underline;"><strong><a href="http://ohhappyday.com/2012/11/faceted-vase-diy-free-template/" target="_blank">Faceted Flower Vessel</a></strong></span>: Here’s a fun option to try when decorating your home at Christmas time. Use a mixture of white, gold and silver for a festive look. (via <span style="text-decoration: underline;"><strong><a href="http://ohhappyday.com/2012/11/faceted-vase-diy-free-template/" target="_blank">Oh Happy Day</a></strong></span>) </p> <p>6. <span style="text-decoration: underline;"><strong><a href="http://www.brit.co/concrete-bottle-vases/" target="_blank">Concrete Vases</a></strong></span>: Grab a drill and some pliers for this very satisfying project. Make a few at once as they look good in a group. (via <span style="text-decoration: underline;"><strong><a href="http://www.brit.co/concrete-bottle-vases/" target="_blank">Brit + Co.</a></strong></span>)</p> <p>7. <span style="text-decoration: underline;"><strong><a href="http://www.brit.co/cactus-planters/" target="_blank">Gold Embellished Planters</a></strong></span>: A basic white vase, some tape, and gold paint are all you need to make these chic planter boxes. Perfect for a housewarming gift. (via <span style="text-decoration: underline;"><strong><a href="http://www.brit.co/cactus-planters/" target="_blank">Brit + Co.</a></strong></span>)</p> <p>8. <span style="text-decoration: underline;"><strong><a href="http://www.brit.co/washi-3d-vases/" target="_blank">3D Printed Washi Tape Vases</a></strong></span>: Find some quirky shaped vases and then decorate with super cute washi tape. (via <span style="text-decoration: underline;"><strong><a href="http://www.brit.co/washi-3d-vases/" target="_blank">Brit + Co.</a></strong></span>)</p> <p>9. <strong><span style="text-decoration: underline;"><a href="http://www.stylemepretty.com/gallery/picture/721297/" target="_blank">Rope Bloom Bowls</a></span></strong>: Looking for the perfect accent for a nautical themed room in your home? The beige rope looks great against a brightly coloured flower arrangement. (via <span style="text-decoration: underline;"><strong><a href="http://www.stylemepretty.com/gallery/picture/721297/" target="_blank">Style Me Pretty</a></strong></span>)</p> <p>10. <span style="text-decoration: underline;"><strong><a href="http://www.brit.co/diy-basics-beer-bottle-bud-vases/" target="_blank">Painted Flower Bottles</a></strong></span>: Dig through the recycling to create a great collection of brightly coloured glass vases. These look great with some classic white flowers inside. (via <strong><a href="http://www.brit.co/diy-basics-beer-bottle-bud-vases/" target="_blank">Brit + Co.</a></strong>) </p> <p>11. <span style="text-decoration: underline;"><strong><a href="http://www.brit.co/diy-basics-inside-out-painted-jars/" target="_blank">Metallic Mason Jars</a></strong></span>: A glass jar becomes a statement piece simply by spray painting the outside or painting the inside. (via <span style="text-decoration: underline;"><strong><a href="http://www.brit.co/diy-basics-inside-out-painted-jars/" target="_blank">Brit + Co.</a></strong></span>)</p> <p>12. <span style="text-decoration: underline;"><strong><a href="http://www.brit.co/10-ways-bud-vase/" target="_blank">Chalkboard-Dipped Vase</a></strong></span>: For a fun place setting, use some blackboard paint on a plain white vase. Re-use at any event, and customise with paint, stickers or ribbon. (via <span style="text-decoration: underline;"><strong><a href="http://www.brit.co/10-ways-bud-vase/" target="_blank">Brit + Co.</a></strong></span>)</p> <p>Related links:</p> <p><a href="/lifestyle/home-garden/2016/03/ways-to-repurpose-old-picture-frames/"><span style="text-decoration: underline;"><em><strong>12 ways to repurpose old picture frames</strong></em></span></a></p> <p><a href="/travel/travel-insurance/2016/03/how-to-make-a-diy-travel-wallet/http://www.oversixty.co.nz/travel/travel-tips/2016/03/how-to-make-a-diy-travel-wallet/"><span style="text-decoration: underline;"><em><strong>How to make a DIY travel wallet</strong></em></span></a></p> <p><a href="/lifestyle/home-garden/2016/03/diy-fabric-covered-notebooks/"><span style="text-decoration: underline;"><em><strong>DIY fabric-covered notebooks</strong></em></span></a></p>

Home & Garden

Placeholder Content Image

DIY 3-step vases

<p>If you’ve ever had fresh blooms delivered, there’s a good chance they came in a rather non-descript glass vase. Over the years, these non-descript glass vases seem to procreate, multiplying in number till you’ve got a shelf full. While every household needs a few plain glass vessels, there’s something much more fun about colour. Not only will a colourful vase brighten up your home, it also complements the blooms contained within. Fortunately, it’s quick, easy AND inexpensive to transform plain glass vases into something much more eye-catching. Here’s how.</p> <p><strong><span style="text-decoration: underline;">You will need:</span></strong></p> <ul> <li>Plain glass vases (small to medium sized)</li> <li>Puffy paint from an art and craft store</li> <li>Matte spray paint in your choice of colour(s)</li> </ul> <p><strong><span style="text-decoration: underline;">How to:</span></strong></p> <p><strong>Note: </strong>Make sure your vases are clean and dust free before painting. A quick rinse or wipe down with a damp cloth with ensure a smooth, easily painted surface.</p> <p><strong>1. Apply puffy paint</strong></p> <p>Use puffy paint to carefully place evenly spaced columns of dots on to your vase. This will add texture and give a funky look and feel to the finished product.</p> <p><strong>2. Adhere to drying time</strong></p> <p>Allow puffy paint ample time to dry completely before the next step.</p> <p><strong>3. Spray paint</strong></p> <p>Cover surface with newspaper or a protective sheet and spray vase with your chosen colour. Allow to dry before adding a second coat. Let the vases dry completely in a protected spot before use.</p> <p><em>Image credit: FlipDigs.com</em></p>

Home & Garden

Placeholder Content Image

How to make beautiful lace vases

<p>Lace: from gloves to dresses to curtains, it’s one of the most recognisably feminine fabrics. Try these DIY lace vase tutorials, where femininity meets function, for a new way to use the material around your home.</p> <p><strong><span style="text-decoration: underline;">You will need: </span></strong></p> <ul> <li>Lace</li> <li>Jar/vase</li> <li>Scissors</li> <li>Fabric scraps (optional, method 1)</li> <li>Fabric stiffener or spray starch (method 1)</li> <li>Sewing supplies (method 1)</li> <li>Iron (method 1)</li> <li>Decoupage adhesive (method 2)</li> </ul> <p><strong><span style="text-decoration: underline;">How to – Fabric stiffener:</span></strong></p> <p><strong><span style="text-decoration: underline;"><img width="316" height="178" src="https://oversixtydev.blob.core.windows.net/media/7601/45089-1_ass.jpg" alt="45089-1_ass" style="display: block; margin-left: auto; margin-right: auto;"/></span></strong></p> <p>1. Spray your piece of lace with fabric stiffener or spray starch and press flat using an iron until stiff. Be careful to use the appropriate heat setting depending on the fabric of your lace.</p> <p>2. Wrap the lace around the base of your jar with the wrong side facing out. Pin seam together, leaving a five-mm allowance.</p> <p>3. Remove from jar and stitch seam together.</p> <p>4. If your lace does not stay up on its own, you have the option of adding a base for stability. Trace the base of the jar to your scrap fabric, cut out, and stitch to the bottom of your lace, again with a 5mm seam.</p> <p>5. Turn lace construct right-side out. If thick enough, let stand alone or return over base of jar.</p> <p><em><a href="http://www.homelife.com.au/how+to/how+to+make+lace+vessels+,24731"></a>Photo source: homelife</em></p> <p><strong><span style="text-decoration: underline;">How to – Decoupage:</span></strong></p> <p><strong><span style="text-decoration: underline;"><img width="499" height="420" src="https://oversixtydev.blob.core.windows.net/media/7600/two-shots-v3_499x420.jpg" alt="Two -Shots -v3" style="display: block; margin-left: auto; margin-right: auto;"/></span></strong></p> <p>1. Cut lace to size if necesssary, long enough to cover desired portion of vase while leaving enough to fold under at base.</p> <p>2. Add a layer of decoupage on vase and place lace over top, working in sections to ensure lace lies flat.</p> <p>3. After covering entirety of vase with lace, coat with second layer of decoupage and let dry.</p> <p>4. Cut hanging piece at base into strips for moulding ease.</p> <p>5. If you would like to add a heart decal to the base of your vase, draw heart on paper and tape to the bottom of the vase. Fold strips of lace over top and use a sharpie to trace heart onto lace. Cut individual lace pieces, shaping according to sharpie outline.</p> <p>5. Add layer of decoupage to base (avoiding paper heart), lay strips flat over top. Remove heart and add a second layer over lace. Let dry and you’re done!</p> <p>Try these methods on candle holders or add ribbon, burlap or twine for added flourish.</p> <p><em><a href="http://matchmadeonhudson.com/diy-lace-vase-with-heart/"></a>Photo source: matchmadeonhudson </em></p> <p> </p>

Home & Garden