Placeholder Content Image

Tropical banana cake with salted peanut caramel sauce

<p>If you’re really looking to go all out, this tropical banana cake with salted peanut caramel sauce is a striking dessert that tastes as good as it looks. If there are any leftovers of, they will keep for a few days in the fridge.</p> <p><strong><span style="text-decoration: underline;">Serves:</span></strong> Six to eight</p> <p><strong><span style="text-decoration: underline;">Ingredients:</span></strong></p> <p><em>Banana cake</em></p> <ul> <li>125g butter, softened</li> <li>1 cup brown sugar</li> <li>1 teaspoon vanilla extract</li> <li>2 tablespoons rum</li> <li>2 eggs</li> <li>3 ripe bananas, mashed</li> <li>1/4 cup coconut milk</li> <li>1/2 cup desiccated coconut</li> <li>1/2 cup chopped tropical dried fruits, plus extra for garnish</li> <li>2 cups self-raising flour</li> </ul> <p><em>Salted peanut caramel sauce</em></p> <ul> <li>200g caster sugar</li> <li>60ml (4 tablespoons) water</li> <li>60g butter, cut into small cubes</li> <li>1/2 cup cream</li> <li>1 teaspoon soy sauce</li> <li>80g salted roasted peanuts, roughly chopped</li> </ul> <p><em>Filling</em></p> <ul> <li>300ml cream</li> <li>1 tablespoon icing sugar</li> <li>250g sour cream, whisked</li> <li>2 bananas, sliced, tossed in a little lemon or lime juice to prevent browning</li> </ul> <p><strong><span style="text-decoration: underline;">Method:</span></strong></p> <ol> <li>Heat oven to 180°C. Grease and line the base of a 22cm spring-form tin.</li> <li>Cream butter and brown sugar together. Add vanilla and rum, beating to combine. Beat in eggs, mashed bananas and coconut milk. Add desiccated coconut and dried fruits, sift the flour over and gently fold to combine. </li> <li>Spoon into prepared tin and bake 45-50 minutes or until a skewer inserted in the middle comes out clean. Allow to cool. The cake can be made the day before it is needed.</li> <li>For the sauce, place caster sugar and water in a small saucepan and swirl the pan over a medium-high heat until sugar dissolves.</li> <li>Bring to the boil and cook, swirling the pan occasionally, until a rich caramel colour. Add butter carefully (mixture may spit) and whisk to combine.</li> <li>Add cream and soy sauce, whisking to combine.</li> <li>Add half the chopped peanuts. Serve immediately or leave covered on the bench (the sauce will become solid if refrigerated). </li> <li>For the filling, whip cream with icing sugar then mix into whisked sour cream.</li> <li>Keep chilled until needed. </li> <li>To assemble, split the cold cake and cover the bottom piece with a layer of sliced banana. Top with half the cream mixture then add the other layer of cake.</li> <li>Cover the top with remaining cream and garnish with remaining peanuts and extra dried tropical fruits. Pour over the caramel sauce and serve.</li> </ol> <p><em>Written by Bernadette Hogg. First appeared on <a href="http://www.stuff.co.nz/" target="_blank" rel="noopener"><strong><span>Stuff.co.nz</span></strong></a>.</em></p> <p><em>Images: Shutterstock</em></p>

Food & Wine

Placeholder Content Image

Chocolate pancakes with caramel and peanut butter sauce

<p>These delicious pancakes come packed with flavours and no dairy – perfect for the whole family!</p> <p><em>Serves 2</em></p> <p><strong><span>Ingredients:</span></strong></p> <p><strong><span>Pancake</span></strong></p> <ul> <li><span>1 cup wholemeal spelt flour</span></li> <li><span>1 cup unsweetened almond milk</span></li> <li><span>3 medjool dates, pitted</span></li> <li><span>3 tbsp raw cacao powder</span></li> <li><span>1 very ripe banana</span></li> </ul> <p><strong><span>Sauce</span></strong></p> <ul> <li><span>1/3 cup coconut milk</span></li> <li><span>2 tbsp <a href="https://mayvers.com.au/product/mayvers-smooth-peanut-butter/">Mayver’s Peanut Butter</a> </span></li> <li><span>3 medjool dates</span></li> </ul> <p><strong><span>Method:</span></strong></p> <ol> <li><span>Blend the dates and the almond milk until they are well combined and there are no chunks.</span></li> <li><span>In a mixing bowl, combine the flour with the cacao powder, date/almond milk from the blender and the banana. Mash the banana through the mixture with a fork.</span></li> <li><span>In a non-stick frypan over medium heat, cook the pancakes for approximately 2 minutes either side. </span></li> <li><span>Blend the sauce ingredients until smooth and creamy. Pour over pancakes when they’re ready.</span></li> <li><span>Enjoy! </span></li> </ol> <p><em><span>Recipe</span></em><span> <em>by <a href="https://www.instagram.com/young_rebecca/">Rebecca Young</a>.</em></span></p>

Food & Wine

Placeholder Content Image

Pay peanuts for business class quality: New economy travel option a game-changer for long-haul flights

<p>A mum travelling with her two young children and her partner has shocked other travellers by bringing their attention to an economy upgrade available on Air New Zealand flights.</p> <p>It’s known as the “SkyCouch” and will leave you forgetting all about the temptation of travelling in business or first class.</p> <p>Melbourne mum Adele Barbaro posted about the economy upgrade on Facebook, where it garnered more than 23,000 comments with curious travellers asking about the experience.</p> <p>“We got to experience the Air New Zealand Skycouch on our way here and for those that don’t know what it is, it is a unique economy option where your entire row becomes a bed,” Adele wrote alongside images of herself and her family using the pullout bed.</p> <p>“If there is 2 of you travelling, you can purchase a third seat at half price and you will get the entire row to yourself.</p> <p>“The legs rest all rise to meet the chair in front and create a completely flat, large play or sleep area.</p> <p>“Paul and Harvey had a bed and so did Chloe and I. It’s the next best thing to business (but way cheaper) and perfect for long haul flights with young families. And we all slept.”</p> <p><iframe src="https://www.facebook.com/plugins/post.php?href=https%3A%2F%2Fwww.facebook.com%2FTheRealMumma%2Fposts%2F893564864353449&amp;width=500" width="500" height="789" style="border: none; overflow: hidden;" scrolling="no" frameborder="0" allowtransparency="true" allow="encrypted-media"></iframe></p> <p>The upgrade allows a row of seats to be turned into a couch or a bed after take-off. This means that you’re able to take advantage of the entire row and can use it to lounge or rest on your flight.</p> <p>Passengers are able to purchase the flight add-on from $200 each way (based on a Sydney to Los Angeles flight) when three people have booked the seat row.</p> <p>There’s not a separate price for SkyCouch, as Air New Zealand charges for one economy seat plus the additional fee. However, it will cost you more if you’re travelling alone as you’re reserving the whole row.</p> <p>Many parents have praised the economy upgrade.</p> <p>“Best thing we did was get the sky couch for our holiday kids slept 7 out of 14 hour flight that’s a win for me,” one person wrote.</p> <p>“Skycouch was amazing on our recent trip to USA,” another added. “I wish every airline would allow this.”</p>

Travel Tips

Placeholder Content Image

Crunchy vegetable chips with peanut dip

<p>Oven–baked chips are not only healthier than those that are fried - their flavour is fresher too. Here, thin slices of beetroot and potato are baked to make dippers for a spicy Southeast Asian dip. If possible, slice the vegetables with a mandolin to ensure they are all an even thickness.</p> <div id="ingredients"><strong>Ingredients:</strong> <ul class="no-bullet"> <li>2 teaspoons sunflower oil</li> <li>1 large red Asian shallot, finely chopped</li> <li>1 clove garlic, crushed</li> <li>½ teaspoon ground cumin</li> <li>½ teaspoon ground coriander</li> <li>¼ cup (60 g) crunchy peanut butter</li> <li>1 tablespoon light soy sauce</li> <li>1 tablespoon honey</li> <li>1 tablespoon lemon juice</li> <li>2 potatoes, about 350 g in total, scrubbed</li> <li>3 beetroot, about 350 g in total, scrubbed</li> <li>2 tablespoons sunflower oil</li> <li>½ teaspoon sea salt flakes</li> </ul> </div> <p><strong>Preparation:</strong></p> <div> <ol> <li>To make the dip, heat the oil in a small saucepan over a moderate heat, add the shallot and garlic, and fry, stirring frequently, for 3–4 minutes, or until the shallot is soft and golden brown.</li> <li>Stir in the cumin and coriander, and cook for a further few seconds, then add the peanut butter, soy sauce, honey and 4 tablespoons water.</li> <li>Stir over a gentle heat until the ingredients are smoothly combined.</li> <li>Remove from the heat and mix in the lemon juice.</li> <li>Spoon into a small bowl, cover and set aside in a cool place while preparing the chips.</li> <li>Preheat the oven to 220°C.</li> <li>Cut the potatoes and beetroot into very thin slices, about 3 mm, preferably using a mandolin.</li> <li>Alternatively, use the fine slicing blade in a food processor, or slice as thinly and evenly as possible with a sharp knife.</li> <li>Put the potato and beetroot slices in 2 separate large bowls and add 1 tablespoon oil to each bowl.</li> <li>Toss the vegetable slices until they are all coated lightly with oil, then spread them out, making sure they are in a single layer, on 3 large non–stick baking trays (or on ordinary baking trays lined with baking paper).</li> <li>Sprinkle the slices evenly with the sea salt flakes.</li> <li>Bake for 35 minutes, turning the vegetables over frequently and swapping round the position of the baking trays each time you turn the vegetables, until the potatoes are crisp and golden and the beetroot is firm but still slightly moist.</li> <li>Keep a close eye on the chips towards the end of their baking time, to be sure they do not burn, removing them as soon as they are ready.</li> <li>Transfer to a wire rack.</li> <li>To serve, place the bowl of dip on a large serving platter and pile the cooled chips around it.</li> </ol> <p><em>This article first appeared in </em><span><a href="http://www.readersdigest.com.au/recipes/vegetable-chips-with-peanut-dip"><em>Reader’s Digest</em></a><em>. For more of what you love from the world’s best-loved magazine, </em><a href="http://readersdigest.innovations.co.nz/c/readersdigestemailsubscribe?utm_source=over60&amp;utm_medium=articles&amp;utm_campaign=RDSUB&amp;keycode=WRN87V"><em>here’s our best subscription offer.</em></a></span></p> </div> <p><img style="width: 100px !important; height: 100px !important;" src="https://oversixtydev.blob.core.windows.net/media/7820640/1.png" alt="" data-udi="umb://media/f30947086c8e47b89cb076eb5bb9b3e2" /></p>

Food & Wine

Placeholder Content Image

Surprising things you can do with peanut butter

<p>It’s delicious on toast, in a banana smoothie, or baked into a choc chip biscuit, but did you know that peanut butter has many uses outside of the kitchen? You might be surprised to learn just how versatile this spread really is. </p> <p><strong>1. Feed the birds</strong></p> <p>Grab a pinecone and rub spoonfuls of peanut butter all over it to make a simple bird feeder. Attach some string and hang it up in your garden where you want the birds to visit.</p> <p><strong>2. Remove gum from shoes</strong></p> <p>Apply peanut butter to the area and leave it for a minute or two, then wipe off with a clean cloth.</p> <p><strong>3. Catch a mouse</strong></p> <p>No, not all mice love cheese as much as you’ve been led to believe. In fact what they really love is peanut butter, and the good thing about it is that it makes them sit for a while to lick the trap. This gives your mousetrap plenty of time to catch the little critter, rather than grabbing the cheese and scooting off.</p> <p><strong>4. Fix scratched DVD’s</strong></p> <p>If you have old films or music lying around on CD or DVD, they can often become scratched and unusable. You can use peanut butter to ‘fill in’ the gaps caused by the scratches! Simply wet the silver side of the disk and then dry it with a lint-free cloth. Then use your finger to apply a small amount of peanut butter all over the silver side of the disk. Rinse off with warm water, dry again, and you should be able to watch your old films or listen to your favourite tunes again.</p> <p><strong>5. Swallow a pill</strong></p> <p>If the grandkids (or even some adults!) hate swallowing tablets, try this. Place the pill onto a tablespoon of peanut butter, and cover it completely so that it can’t be seen. Encourage the patient to swallow the peanut butter without chewing it, so that the pill goes down without being tasted.</p> <p><strong>6. Fix a squeaky door</strong></p> <p>If you haven’t got any WD40 you can use a smear of peanut butter on the hinges of a squeaky door instead. </p> <p><strong>7. Remove a sticker</strong></p> <p>Don’t you hate when you buy something and can’t peel the price sticker off? Just rub a little peanut butter into the area and the oils will help remove it when you rub it with a cloth.</p> <p>Have we missed anything? Do you use peanut butter anywhere else around the home? We would love to hear your tips in the comments.</p>

Home & Garden

Placeholder Content Image

Chocolate and peanut butter brownies

<p>The combination of chocolate and peanut butter is a rich, salty-sweet delight you’ll love. Give these brownies a go for a delicious spin on the moist, chewy baked snack.</p> <p><strong><span style="text-decoration: underline;">Ingredients:</span></strong></p> <ul> <li>125g unsalted butter, diced</li> <li>120g dark chocolate, roughly chopped</li> <li>⅔ cup plain flour</li> <li>½ teaspoon baking powder</li> <li>¼ teaspoon salt</li> <li>¾ cup sugar</li> <li>3 large eggs</li> <li>2 teaspoons vanilla extract</li> <li>½ cup chocolate chips</li> </ul> <p><em>Drizzle</em></p> <ul> <li>35g unsalted butter, melted</li> <li>¼ cup icing sugar</li> <li>⅓ cup smooth peanut butter</li> <li>⅛ teaspoon salt</li> <li>½ teaspoon vanilla extract</li> </ul> <p><strong><span style="text-decoration: underline;">Method:</span></strong></p> <ol start="1"> <li>Preheat your oven to 160˚C. Grease a 20cm square baking pan and line with baking paper.</li> <li>For the brownie batter, melt the butter and chocolate in a heatproof bowl over a pot of simmering water. Allow this mixture to cool slightly.</li> <li>Whisk the sugar into chocolate mixture, and then add eggs. Whisk together until smooth. Stir in the vanilla.</li> <li>Sift together the flour, baking powder and salt and add to the chocolate. Stir everything until incorporated.</li> <li>For the drizzle, stir together the melted butter, icing sugar, peanut butter, salt, and vanilla until smooth.</li> <li>Pour the chocolate batter into your prepared pan and spread evenly with a spatula. Spoon the drizzle over the tip and swirl it through using a butter knife.</li> <li>Bake for 40 minutes, or until a skewer inserted is not wet when it comes out. Allow to cool in the pan for 15 minutes, then cool to room temperature before cutting into squares.</li> </ol> <p><strong>Related links:</strong></p> <p><span style="text-decoration: underline;"><em><strong><a href="/lifestyle/food-wine/2015/06/gin-and-tonic-cupcakes/">Do gin and tonic cupcakes take your fancy?</a></strong></em></span></p> <p><span style="text-decoration: underline;"><em><strong><a href="/lifestyle/food-wine/2015/06/chocolate-tart/">How about a chocolate tart?</a></strong></em></span></p> <p><span style="text-decoration: underline;"><em><strong><a href="/lifestyle/food-wine/2015/06/strawberry-rhubarb-cobbler/">This strawberry and rhubarb cobbler hits the spot</a></strong></em></span></p>

Food & Wine

Placeholder Content Image

Double-layer peanut butter and jam cake

<p>Here's a peanut butter and jam sandwich – in cake form. You can use smooth or crunchy peanut butter but for best results use a good-quality, natural one.</p> <p><strong><span style="text-decoration: underline;">Serves:</span></strong> 12</p> <p><strong><span style="text-decoration: underline;">Ingredients: </span></strong></p> <ul> <li>50g good quality, natural, salted peanut butter </li> <li>100g butter, softened</li> <li>150g light muscovado sugar or coconut sugar (or regular soft brown sugar)</li> <li>1 tsp vanilla extract</li> <li>3 organic eggs</li> <li>100g ground almonds</li> <li>100g flour</li> <li>2 tsp baking powder</li> <li>½ cup whole milk</li> <li>1 cup fresh or frozen raspberries </li> </ul> <p><em>For the icing: </em></p> <ul> <li>½ cup cream cheese</li> <li>½ cup good-quality, natural, salted peanut butter</li> <li>½ tsp vanilla extract</li> <li>½ cup icing sugar  </li> </ul> <p><em>For the filling:</em></p> <ul> <li>Good-quality, low-sugar raspberry jam (store bought)</li> </ul> <p><em>For the decoration:</em></p> <ul> <li>Whole freeze-dried raspberries</li> </ul> <p><strong><span style="text-decoration: underline;">Method: </span></strong></p> <p>1. Preheat oven to 175C fan bake. Grease and line 2 x 22cm cake tins.</p> <p>2. In the bowl of an electric mixer, beat peanut butter and butter until pale, light and fluffy. Keep beating while you add sugar. Add vanilla and then the eggs, one at a time until well combined. Fold through ground almonds.</p> <p>3. Sift in flour and add baking powder and mix until just combined, and then add the milk. Do not over mix.</p> <p>4. Evenly divide the batter between the two tins and dot with raspberries. Bake for about 30 minutes or until golden in colour, springy to the touch and a skewer inserted in the centre comes out clean. Allow cakes to cool for about 10 minutes before turning out onto a rack.</p> <p>5. Meanwhile, make peanut butter icing. Beat cream cheese until smooth. Blend in remaining ingredients until smooth.</p> <p>6. Once cakes are cool, spread a layer of raspberry jam onto one cake and place the other, flipped upside down, on top to form a sandwich. Ice cake and decorate with freeze-dried raspberries. Store in an airtight container for up to 3 days.</p> <p><em>Written by Jordan Rondel. First appeared on <a href="http://www.stuff.co.nz/" target="_blank"><strong><span style="text-decoration: underline;">Stuff.co.nz.</span></strong></a> Image credit: Emma Boyd via Stuff.co.nz.</em></p> <p><em><strong>Have you ordered your copy of the Over60 cookbook, </strong></em><strong>The Way Mum Made It</strong><em><strong>, yet? Featuring 175 delicious tried-and-true recipes from you, the Over60 community, and your favourites that have appeared on the Over60 website, <a href="https://shop.abc.net.au/products/way-mum-made-it-pbk%20%20%20" target="_blank"><span style="text-decoration: underline;">head to the abcshop.com.au to order your copy now.</span></a></strong></em></p>

Food & Wine

Placeholder Content Image

Salty peanut and sesame cookies

<p>These salty peanut and sesame cookies from Tracey Lister &amp; Andrews Pohl’s new recipe collection<em> Made in Vietnam</em>, will go down a treat with the whole family. These tasty cookies are fun to make (and even more fun to eat).</p> <p><strong><span style="text-decoration: underline;">Makes:</span> </strong>20</p> <p><strong><span style="text-decoration: underline;">Ingredients:</span></strong></p> <ul> <li>185g plain (all-purpose) flour</li> <li>105g ground peanuts</li> <li>80g caster (superfine) sugar</li> <li>1 teaspoon salt</li> <li>100g butter, at room temperature</li> <li>1 egg yolk, lightly whisked</li> <li>1 teaspoon white sesame seeds</li> <li>1 teaspoon black sesame seeds</li> </ul> <p><strong><span style="text-decoration: underline;">Method:</span></strong></p> <ol> <li>Sift the flour, ground peanuts, sugar and salt into a bowl.</li> <li>Using your fingertips, rub in the butter until combined. You may need to add a small amount of water if the mixture seems too dry.</li> <li>When combined, lightly knead the dough on a work surface, then leave to rest in the refrigerator for 20 minutes.</li> <li>Roll the dough between two sheets of baking paper until it is 5mm thick. Cut into discs using a 5cm biscuit cutter and place on a baking tray.</li> <li>Brush the cookies with the egg yolk and sprinkle with the sesame seeds. Place the tray of cookies in the fridge and chill for 10 minutes.</li> <li>Meanwhile, preheat the oven to 180°C.</li> <li>Take the tray directly from the fridge into the oven and bake for 15 minutes. Remove from the oven and leave to cool.</li> <li>These cookies will keep for a week in an airtight container.</li> </ol> <p>Have you ever tried a dish like this one?</p> <p><img width="184" height="210" src="https://oversixtydev.blob.core.windows.net/media/37989/made-in-vietnam-cover_184x210.jpg" alt="Made -in -Vietnam -Cover (1)" style="float: right;"/></p> <p><em>This is an edited extract from Made in Vietnam by Tracey Lister &amp; Andrews Pohl published by Hardie Grant Books RRP $39.99 and is available in stores national.</em></p> <p><em><strong>Have you ordered your copy of the Over60 cookbook, </strong></em><strong>The Way Mum Made It</strong><em><strong>, yet? Featuring 175 delicious tried-and-true recipes from you, the Over60 community, and your favourites that have appeared on the Over60 website, <a href="https://shop.abc.net.au/products/way-mum-made-it-pbk" target="_blank"><span style="text-decoration: underline;">head to the abcshop.com.au to order your copy now</span></a>.</strong></em></p>

Food & Wine

Placeholder Content Image

Lemongrass panna cotta with peanut praline, watermelon granita and pineapple

<p>This elegant lemongrass panna cotta with peanut praline, watermelon granita and pineapple dessert will please any dinner party.</p> <p><strong><span style="text-decoration: underline;">Ingredients:</span></strong></p> <p><em>For the granita</em></p> <ul> <li>400ml watermelon juice</li> <li>75ml vodka</li> <li>75ml champagne</li> <li>15ml lemon juice</li> <li>75g caster sugar</li> </ul> <p><em>For the panna cotta</em></p> <ul> <li>2 lemongrass stalks, chopped</li> <li>roughly</li> <li>4 kaffir lime leaves, chopped</li> <li>400ml coconut milk</li> <li>300ml full cream milk</li> <li>75g caster sugar</li> <li>3 gelatine leaves, soaked</li> </ul> <p><em>For the praline</em></p> <ul> <li>100ml water</li> <li>200g caster sugar</li> <li>100g chopped roasted peanuts</li> </ul> <p><em>For the garnish</em></p> <ul> <li>200g pineapple, diced into small cubes</li> <li>4 Vietnamese mint leaves, shredded</li> </ul> <p><strong><span style="text-decoration: underline;">Method:</span></strong></p> <p>1. Make the granita first by combining all granita ingredients in a saucepan. Heat to a gentle simmer, and do not boil. Pour the mixture into a tray and freeze. When the mixture starts to freeze, use a fork to scrape through the mix. Do this every half hour until you have a flaky ice slush.</p> <p>2. To make the panna cotta, place all ingredients in a saucepan and bring to the boil. Reduce heat and simmer for a further 10 minutes. Strain, then set aside to cool slightly. Pour into martini glasses and allow to set for at least 4 hours.</p> <p>3. Meanwhile, make the praline by combining the water and sugar in a saucepan. Stir over low heat until sugar dissolves. Increase the heat and bring to a boil, without stirring, until mixture is a caramel colour. Remove from the heat, stir in the peanuts and pour onto a lightly greased, or silicon paper-lined, tray. Allow to cool and set, then grind in a mortar and pestle or a food processor to a course powder.</p> <p>4. To assemble, top panna cotta with pineapple, sprinkle over some praline and top with a mound of granita. Sprinkle over more praline and a little of the shredded Vietnamese mint. Serve immediately.</p> <p><em><strong>Have you ordered your copy of the Over60 cookbook, </strong></em><strong>The Way Mum Made It</strong><em><strong>, yet? Featuring 175 delicious tried-and-true recipes from you, the Over60 community, and your favourites that have appeared on the Over60 website, <a href="https://shop.abc.net.au/products/way-mum-made-it-pbk" target="_blank"><span style="text-decoration: underline;">head to the abcshop.com.au to order your copy now</span></a>.</strong></em></p>

Food & Wine

Placeholder Content Image

How this man turned a family recipe into a fortune

<p>To say Bruce Picot’s fortunes have turned around in recently years would be the understatement of the century. And it all started with a jar of peanut butter.</p> <p>Picot, who at that stage owned a laundromat in New Zealand, had purchased a jar of generic peanut butter from the supermarket, only to be shocked by the sugar content.</p> <p>Picot told News.com.au, “In New Zealand, we never used to have sugar in our peanut butter. But I had seen American peanut butter which loved putting sugar into their spreads, and I knew that would eventually come here.</p> <p>“About 12 years ago, I purchased a 1kg tub of regular peanut butter, and all I could taste was the sugar. It was really disappointing and disgusting.”</p> <p>Picot was so incensed he called customer support to complain, who informed him that the sugar content was to cater for modern tastes. But instead of accepting this, he opened the family vault and try his family’s recipe for peanut butter.</p> <p>Picot says, “My mum and aunt used to make peanut butter at home, by using an old Vitamix blender. They would roast some peanuts and squash them up at home in the kitchen. Then they’d add a little salt, and that was it. Peanuts and salt.”</p> <p>Picot made a couple of jars for his family. His son, who was 12 at the time, loved it so much that he shared it with his friends. And it was not too long until word spread.</p> <p>Picot says, “They gave me $5 for a jar of the peanut butter because they thought it was the best. That’s when I thought that maybe people would actually buy it if I made enough of it.”</p> <p>Here’s where Picot’s story takes a twist. As his laundromat business struggled, Picot was diagnosed with Macular Degeneration. No longer able to read or write, he eventually had to give up his business completely which was keeping him afloat.</p> <p>So, Picot decided to go for broke and take his peanut butter to a local market. It was not too long until word spread and soon Picot was selling jars faster than he could make them.</p> <p>“People from all over New Zealand started to come and see me in Nelson, and locals would come back every week to buy another jar,” he said.</p> <p>“It was really starting to work, and some people started to ask about ordering online, so that’s when I decided to start a mail order business.”</p> <p>Demand kept rising, forcing Picot to invest in a proper manufacturing facility. Today Pic’s Peanut Butter is found in supermarkets around the world with 15,000 jars of peanut butter made every day (working out to be 2.5 million jars a year).</p> <p>And Picot couldn’t be happier, “It’s wonderful to be able to say to people they can get the peanut butter in big supermarkets because everybody knows where they are.”</p> <p>What a lovely story! Do you have any family recipes? Who knows, you could be sitting on a goldmine.</p> <p><em>Image credit: Facebook / Pic’s Peanut Butter</em></p>

Retirement Income

Placeholder Content Image

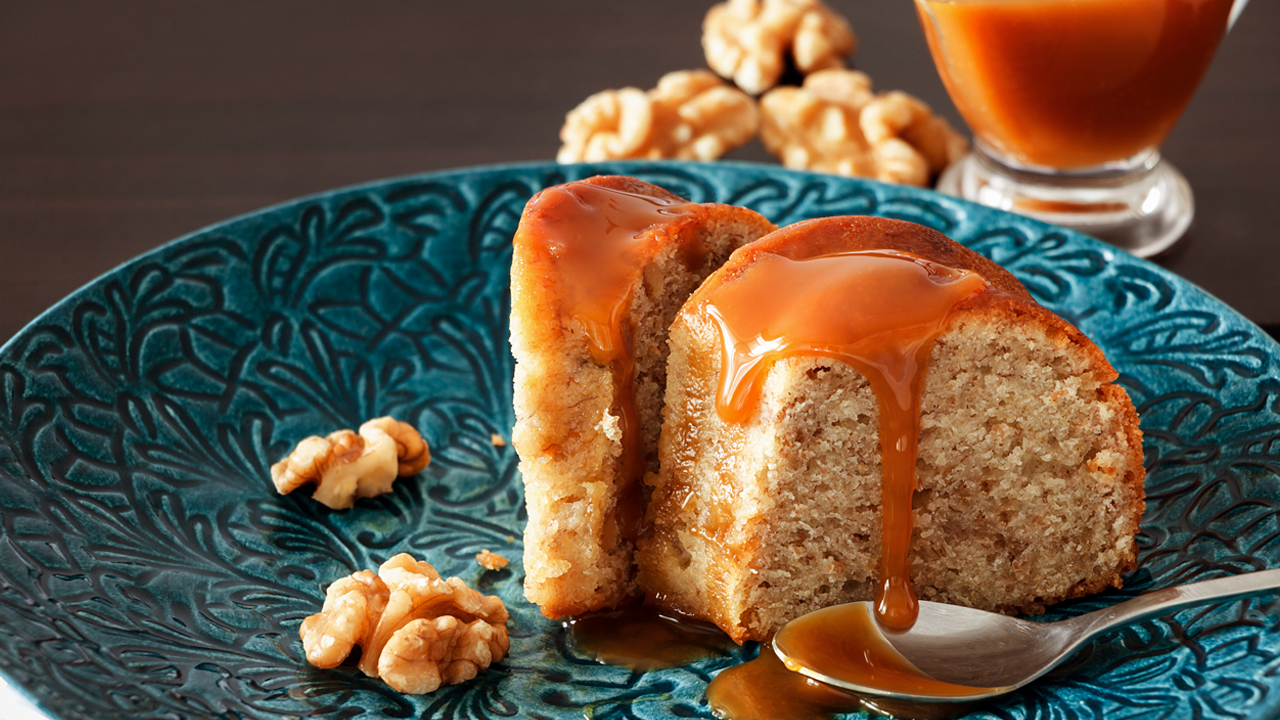
Salted caramel peanut tart, banana caramel ice cream and dark chocolate sauce

<p>One of my dearest girlfriends is a banoffee pie fanatic, and I was thinking of her as I created these recipes.</p> <p>The tart is super-indulgent, loaded with sweet, rich caramel, and salty, crunchy roasted peanuts. The banana caramel icecream is wickedly decadent with a good hit of natural banana flavour, which pairs beautifully with the tart.</p> <p>This dessert is definitely a special occasion treat, and to really top it off, a small drizzle of deep, dark chocolate sauce will have your guests waddling away from the dinner table totally satisifed!</p> <p><strong><span style="text-decoration: underline;">Serves:</span></strong><em> </em>10-12</p> <p><strong><span style="text-decoration: underline;">Ingredients:</span></strong></p> <p><em>For the tart</em></p> <ul> <li>90g cold butter, chopped</li> <li>¼ cup icing sugar</li> <li>1 ¼ cups plain flour</li> <li>½ cup good quality crunchy peanut butter</li> <li>1 teaspoon sea salt</li> <li>1 egg yolk</li> <li>½ -1 tablespoon cold water</li> <li>1 x 395g tin sweetened condensed milk</li> <li>1 x 395g tin caramel sweetened condensed milk (or dulce de leche)</li> <li>1 tablespoons golden syrup</li> <li>¾ cup salted, roasted peanuts</li> </ul> <p><em>For the ice cream</em></p> <ul> <li>4 bananas, sliced and frozen in a sealed container overnight</li> <li>1 x 395g tin caramel sweetened condensed milk</li> <li>1 cup softly whipped cream</li> <li>⅔ cup chopped, roasted nuts</li> </ul> <p><em>For the dark chocolate sauce</em></p> <ul> <li>200ml cream</li> <li>180g dark chocolate, roughly chopped</li> </ul> <p><strong><span style="text-decoration: underline;">Method:</span></strong></p> <p><em>For the tart</em></p> <ol> <li>Put the butter in a food processor with the icing sugar and flour. Whiz to combine, then add 3 tablespoons of the peanut butter with the sea salt, egg yolk, and half of the water. Pulse until the dough starts coming together, adding the extra water if necessary. Tip out on to a clean bench and pat into a smooth disc. Wrap the pastry in plastic wrap and refrigerate for 20 minutes.</li> <li>Pre-heat the oven to 180 degrees Celsius, and roll the pastry out to fit a 25cm removable base tart tin.</li> <li>Ease the pastry into the tin, patching up any tears, and trim the top. Prick the base lightly with a fork and pop back in the fridge for 10 minutes.</li> <li>Line the base and sides of the pastry with a circle of baking paper 3cm bigger than the tart tin, and fill with baking beans or rice. Bake for 12 minutes, remove the baking beans and paper, and bake for a further 10 minutes.</li> <li>While the pastry is cooking, put the remaining peanut butter in a large microwave-safe bowl with the condensed milks and golden syrup. Heat 3x for 30 seconds, then whisk until smooth. Heat for a further 30 seconds if necessary.</li> <li>Once the pastry is baked, pour the filling into the case and sprinkle over the nuts, giving the tin a little jiggle to encourage the nuts to settle into the caramel. Bake a further 20-25 minutes until golden and set.</li> <li>Leave to cool in the tin then remove and serve at room temperature with the banana caramel ice cream and optional dark chocolate sauce.</li> </ol> <p><em>For the ice cream</em></p> <ol> <li>Put the frozen bananas in a food processor and whiz with the sweetened condensed milk until the mixture is smooth. Add the whipped cream and pulse to combine.</li> <li>Pour into a container, cover, and freeze for 3 hours. Swirl in ¾ of the roasted nuts and freeze a further 6 hours. When serving, sprinkle with remaining chopped nuts.</li> </ol> <p><em>For the chocolate sauce</em></p> <ol> <li>Heat the cream until simmering by microwaving for 45 seconds. Add the chocolate and leave to sit for 1 minute.</li> <li>Whisk until the chocolate is melted and the sauce is smooth. If necessary, microwave again for 1 or 2 15 second bursts, whisking in between.</li> </ol> <p><em>Written by Sarah Tuck. First appeared on <a href="http://Stuff.co.nz" target="_blank"><strong><span style="text-decoration: underline;">Stuff.co.nz</span></strong></a>.</em></p> <p><strong><em>Have you ordered your copy of the Over60 cookbook, </em>The Way Mum Made It<em>, yet? Featuring 175 delicious tried-and-true recipes from you, the Over60 community, and your favourites that have appeared on the Over60 website, <a href="https://shop.abc.net.au/products/way-mum-made-it-pbk" target="_blank"><span style="text-decoration: underline;">head to the abcshop.com.au to order your copy now</span></a>.</em></strong></p> <p><strong>Related links:</strong></p> <p><a href="/lifestyle/food-wine/2016/05/french-apple-tart/"><strong><em><span style="text-decoration: underline;">French apple tart</span></em></strong></a></p> <p><a href="/lifestyle/food-wine/2016/04/neenish-tarts/"><em><span style="text-decoration: underline;"><strong>Neenish tarts</strong></span></em></a></p> <p><a href="/lifestyle/food-wine/2016/02/citron-tart/"><strong><em><span style="text-decoration: underline;">Citron tart</span></em></strong></a></p>

Food & Wine

Placeholder Content Image

Easy peanut butter fudge

<p>The perfect combination of sweet and savoury, whip up this treat in just a few minutes and enjoy the bite-sized deliciousness. It will also make a thoughtful gift when packaged up in a jar with a ribbon on top.</p> <p><strong><span style="text-decoration: underline;">Ingredients:</span></strong></p> <ul> <li>½ cup butter</li> <li>½ cup milk</li> <li>2 ¼ cups brown sugar</li> <li>¾ cup smooth peanut butter</li> <li>1 teaspoon vanilla extract</li> <li>3 ½ cups icing sugar</li> </ul> <p><strong><span style="text-decoration: underline;">Method:</span></strong></p> <ol> <li>Melt the butter in a medium saucepan over a medium heat.</li> <li>Stir in the brown sugar and milk. Bring to the boil and boil for two minutes, stirring frequently.</li> <li>Remove the pan from the heat and stir in the peanut butter and vanilla extract.</li> <li>Pour the icing sugar into a large bowl and pour the butter mixture over the top and beat until smooth.</li> <li>Pour into a 20cm by 20cm pan lined in baking paper and chill in the fridge until firm.</li> <li>Cut into squares and serve.</li> </ol> <p><strong>Related links:</strong></p> <p><span style="text-decoration: underline;"><em><strong><a href="/lifestyle/food-wine/2015/04/lemon-yoghurt-cake/" target="_blank">Looking for another easy dessert? Try this simple lemon yoghurt cake</a></strong></em></span></p> <p><span style="text-decoration: underline;"><em><strong><a href="/lifestyle/food-wine/2015/04/avocado-hummus/" target="_blank">This avocado hummus couldn’t be simpler to make</a></strong></em></span></p> <p><span style="text-decoration: underline;"><em><strong><a href="/lifestyle/food-wine/2015/04/salted-caramel-sauce/" target="_blank">Making your own salted caramel sauce is easier than you think</a></strong></em></span></p>

Food & Wine

Placeholder Content Image

Bang bang chicken noodle salad

<p>Spice up your lunch with this refreshing chicken noodle salad. This light, flavoursome dish is easy to make and serves as the perfect midday meal.</p> <p><strong><span style="text-decoration: underline;">Ingredients:</span></strong></p> <ul> <li>4 chicken breasts</li> <li>1 thumb of ginger, sliced</li> <li>Half a cucumber, cut into matchsticks</li> <li>2 celery stalks, cut into matchsticks</li> <li>1 carrot, cut into matchsticks</li> <li>2 tablespoon rice vinegar</li> <li>1 tablespoon sugar</li> <li>1 tsp salt</li> <li>100g bean thread noodles</li> <li>1 tsp sesame seeds</li> </ul> <p><em>For the sauce</em></p> <ul> <li>2 tablespoon peanut butter</li> <li>1 teaspoon sesame oil</li> <li>3 tablespoon soy sauce</li> <li>1 tablespoon rice vinegar</li> <li>2 tablespoon sweet chilli sauce</li> <li>1 teaspoon sugar</li> <li>2 tablespoon peanut oil</li> <li>1 to 2 tablespoon water</li> </ul> <p><strong><span style="text-decoration: underline;">Ingredients:</span></strong></p> <ol> <li>Place the chicken in a saucepan, add the ginger and cover with cold water. Bring to the boil, then simmer gently for 10 minutes.</li> <li>Turn off the heat and leave to steep for another 20 minutes.</li> <li>Toss the cucumber, celery and carrot with the rice vinegar, sugar and salt and set aside for an hour or two. Pour boiling water over the noodles, leave for 4 minutes, then drain.</li> <li>To make the sauce, combine the peanut butter, sesame oil, soy sauce, rice vinegar, sweet chilli sauce, sugar and peanut oil in a bowl, whisking well until the sugar dissolves.</li> <li>Add a dash of water to lighten to pouring consistency.</li> <li>Drain the chicken and finely slice across the grain, discarding skin (strain the stock for future use). Toss the noodles with the lightly pickled vegetables then divide between four plates.</li> <li>Arrange the chicken on top and spoon the peanut sauce on and around.</li> <li>Scatter with sesame seeds and serve with chopsticks.</li> </ol> <p><em><strong>Written by Caroline Velik. First appeared on</strong></em> <a href="http://www.stuff.co.nz/" target="_blank"><strong><em><span style="text-decoration: underline;">Stuff.co.nz</span></em></strong></a></p> <p><strong><em>Have you ordered your copy of the Over60 cookbook, The Way Mum Made It, yet? Featuring 175 delicious tried-and-true recipes from you, the Over60 community, and your favourites that have appeared on the Over60 website,<span style="text-decoration: underline;"><a href="https://shop.abc.net.au/products/way-mum-made-it-pbk" target="_blank"> head to the abcshop.com.au to order your copy now.</a></span></em></strong></p> <p><strong>Related links:</strong></p> <p><span style="text-decoration: underline;"><em><strong><a href="http://www.oversixty.co.nz/lifestyle/food-wine/2016/02/prawn-and-avocado-salad/">Prawn and avocado salad</a></strong></em></span></p> <p><span style="text-decoration: underline;"><em><strong><a href="http://www.oversixty.co.nz/lifestyle/food-wine/2016/02/wild-rice-lemon-dill-salmon/">Wild rice, lemon and dill with pulled salmon</a></strong></em></span></p> <p><span style="text-decoration: underline;"><em><strong><a href="http://www.oversixty.co.nz/lifestyle/food-wine/2015/12/piri-piri-chicken/">Piri piri chicken</a></strong></em></span></p>

Food & Wine

Placeholder Content Image

Frozen banana and peanut butter smoothie

<p>If you’re looking for a thick, substantial smoothie that’s full of flavour, try this recipe for a sweet, delicious frozen banana and peanut butter smoothie.</p> <p><strong><span style="text-decoration: underline;">Ingredients:</span></strong></p> <ul> <li>2 ripe bananas, peeled, coarsely chopped</li> <li>1 ½ cups skim milk</li> <li>¼ cup low-fat natural yoghurt</li> <li>2 tablespoons crunchy peanut butter</li> <li>1 tablespoon honey</li> <li>1 tablespoon wheat germ</li> <li>6 ice cubes</li> <li>Honey, extra, to serve</li> </ul> <p><strong><span style="text-decoration: underline;">Method:</span></strong></p> <ol> <li>Place the banana, milk, yoghurt, peanut butter, honey, wheat germ and ice in the jug of a blender.</li> <li>Blend until well combined.</li> <li>Pour among glasses.</li> <li>Drizzle with extra honey to serve.</li> </ol> <p> <em><strong>Have you ordered your copy of the Over60 cookbook, The Way Mum Made It, yet? Featuring 178 delicious tried-and-true recipes from you, the Over60 community, and your favourites that have appeared on the Over60 website,</strong> </em><strong><em><a href="https://shop.abc.net.au/products/way-mum-made-it-pbk"><span>head to the abcshop.com.au to order your copy now</span>.</a></em></strong></p> <p><strong>Related links:</strong></p> <p><em><span style="text-decoration: underline;"><strong><a href="http://www.oversixty.co.nz/lifestyle/food-wine/2016/02/flourless-orange-cake/">Flourless orange cake</a></strong></span></em></p> <p><em><span style="text-decoration: underline;"><strong><a href="http://www.oversixty.co.nz/lifestyle/food-wine/2015/10/vanilla-custard/">Homemade vanilla custard</a></strong></span></em></p> <p><em><span style="text-decoration: underline;"><strong><a href="http://www.oversixty.co.nz/lifestyle/food-wine/2015/08/potato-bacon-pancakes/">Potato and bacon cakes</a></strong></span></em></p>

Food & Wine

Placeholder Content Image

Homemade peanut butter

<p>There’s nothing like the taste of peanut butter. But why stick with the boring store-bought options? Try this recipe for delicious, homemade peanut butter.</p> <p><strong><span style="text-decoration: underline;">Ingredients:</span></strong></p> <ul> <li>2 cups raw, shelled peanuts</li> <li>½ teaspoon kosher salt, plus more to taste</li> <li>1 to 2 tablespoons peanut oil or other oil (optional, for creamier peanut butter)</li> <li>1 to 2 tablespoons honey or other sweetener (optional, for sweeter peanut butter)</li> </ul> <p><strong><span style="text-decoration: underline;">Method:</span></strong></p> <ol> <li>Heat the oven to 176°C and toast the peanuts on a baking sheet until lightly golden and glossy with oil, about 10 minutes. You can skip this step if you prefer raw nut butter or if you're using pre-toasted nuts; roasting gives the peanut butter a deeper flavour and also helps make the oils looser and easier to blend into a smooth butter.</li> <li>Transfer the peanuts to a food processor or blender. If you toasted your nuts, do this while the nuts are still warm. Pulse a few times just until chopped. For chunky peanut butter, remove 1/2 cup of chopped nuts and set aside.</li> <li>Run the food processor or blender continuously for 1 minute. Stop and scrape down the sides and bottom of the bowl. At this point, the peanut butter will look gritty and dry, almost like couscous.</li> <li>Run the food processor or blender continuously for another minute, then stop and scrape down the sides. At this point, the butter will start clumping together. It's not quite peanut butter, but it's getting there!</li> <li>Run the food processor or blender continuously for another minute, then stop and scrape down the sides. At this point, the butter will be glossy and soft, like very thick peanut butter.</li> <li>Add the salt, oil, sweetener, and any other extras: Sprinkle the salt, oil, sweetener, and any other extras over the top of the peanut butter.</li> <li>Process for 1 to 2 additional minutes. Continue processing the butter until it becomes completely smooth. Homemade peanut butter will still be a little more gritty than Skippy peanut butter, but should be spreadable at this point. Taste and add more salt or other add-ins to taste. If you reserved some nuts for chunky peanut butter add them now and pulse a few times to incorporate.</li> <li>Transfer the peanut butter to storage container: Scrape the peanut butter into a storage container, cover, and refrigerate. The peanut butter can be used immediately and will keep for several weeks in the fridge.</li> </ol> <p><strong>Related links:</strong></p> <p><em><strong><span style="text-decoration: underline;"><a href="/lifestyle/food-wine/2016/02/pecan-pie-recipe/">Pecan pie</a></span></strong></em></p> <p><em><strong><span style="text-decoration: underline;"><a href="/lifestyle/food-wine/2016/02/chocolate-biscuit-pudding/">Chocolate biscuit pudding</a></span></strong></em></p> <p><em><strong><a href="/lifestyle/food-wine/2016/01/chocolate-oreo-buttercream-cupcakes/"><span style="text-decoration: underline;">Chocolate oreo buttercream cupcakes</span></a></strong></em></p>

Food & Wine