Placeholder Content Image

How to make the perfect pavlova, according to chemistry experts

<p><em><a href="https://theconversation.com/profiles/nathan-kilah-599082">Nathan Kilah</a>, <a href="https://theconversation.com/institutions/university-of-tasmania-888">University of Tasmania</a> and <a href="https://theconversation.com/profiles/chloe-taylor-1400788">Chloe Taylor</a>, <a href="https://theconversation.com/institutions/university-of-tasmania-888">University of Tasmania</a></em></p> 
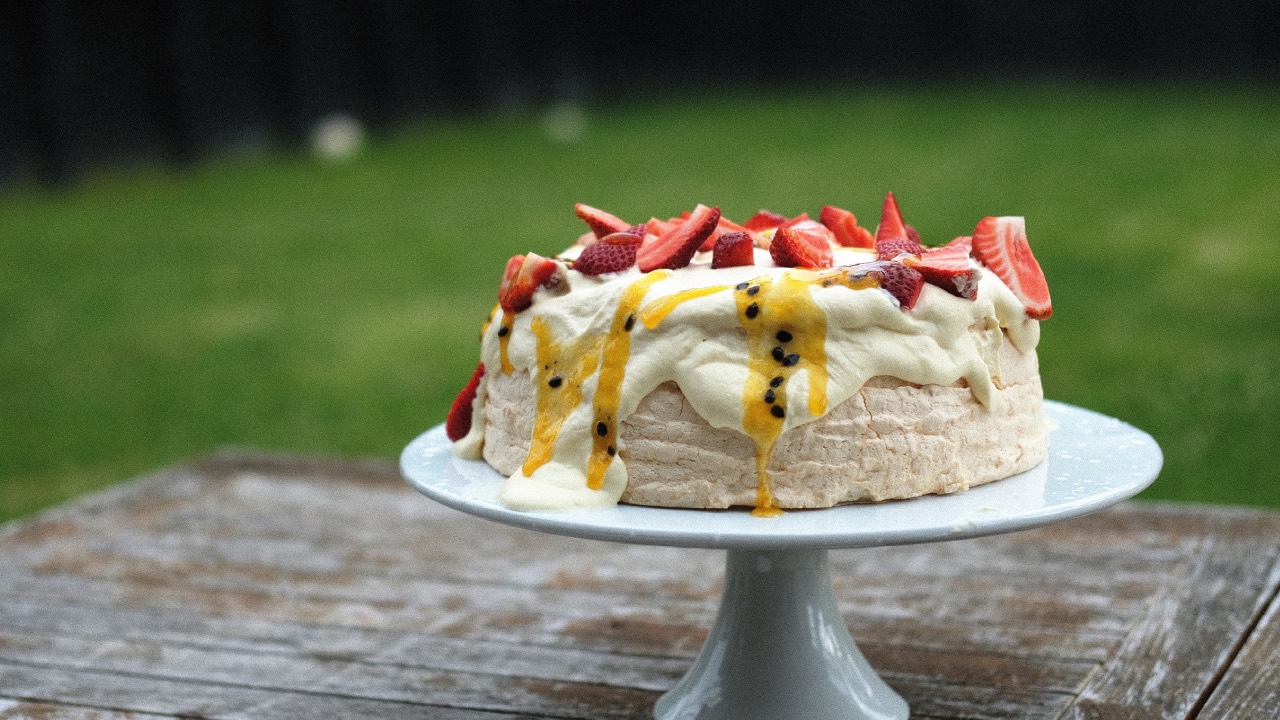
<p>The pavlova is a summer icon; just a few simple ingredients can be transformed into a beautifully flavoured and textured dessert.</p> <p>But despite its simplicity, there’s a surprising amount of chemistry involved in making a pavlova. Knowing what’s happening in each step is a sure-fire way to make yours a success.</p> <p>So exactly what does it take to make the perfect pavlova? Let us break it down for you.</p> <h2>Egg whites</h2> <p><a href="https://theconversation.com/eight-cracking-facts-about-eggs-150797">Egg white</a> is basically a mixture of proteins in water. Two of these proteins, ovalbumin and ovomucin, are the key to forming a perfect foamy meringue mixture.</p> <p>Whipping the egg whites agitates the proteins and disrupts their structure, causing them to unfold so the protein’s interior surface is exposed, in a process <a href="https://theconversation.com/sunny-side-up-can-you-really-fry-an-egg-on-the-footpath-on-a-hot-day-172616">known as denaturing</a>. These surfaces then join with one another to trap air bubbles and turn into a stable foam.</p> <p>Egg yolk must be completely removed for this process to work. Yolk is mostly made of fat molecules, which would destabilise the protein network and pop the air bubbles. It only takes a trace amount of fat, or even just a greasy bowl, to disrupt foam formation.</p> <p>You should always whip your egg whites in a clean glass or metal bowl. Plastic bowls are more likely to hold leftover grease.</p> <h2>Sugar</h2> <p>A traditional pavlova uses sugar – a lot of it – to provide texture and flavour. The ratio of sugar to egg white will differ between recipes.</p> <p>The first thing to remember is that adding more sugar will give you a drier and crispier texture, whereas less sugar will lead to a softer and chewier pavlova that won’t keep as long.</p> <p>The second thing is the size of the sugar crystals. The larger they are, the longer they’ll need to be whipped to dissolve, and the greater the chance you will overwork the proteins in your meringue. Powdered icing sugar (not icing mixture) is preferable to caster or granulated sugar.</p> <p>If you do happen to overbeat your meringue (which may end up looking clumpy and watery) you can try to save it by adding another egg white.</p> <h2>Acid</h2> <p>Many pavlova recipes call for adding cream of tartar or vinegar. Cream of tartar is also known as potassium hydrogen tartrate, which you may have seen in the form of crystals at the <a href="https://theconversation.com/louis-pasteurs-scientific-discoveries-in-the-19th-century-revolutionized-medicine-and-continue-to-save-the-lives-of-millions-today-191395">bottom of a wine glass</a>.</p> <p>These acids act as a stabilising agent for the meringue by aiding in the unfolding of the egg white proteins. More isn’t always better, though. Using too much stabiliser can affect the taste and texture, so use it sparingly.</p> <h2>Heat</h2> <p>Cooking a pavlova requires a very slow oven for specific chemical reasons. Namely, egg white proteins gel at temperatures above 60°C, setting the meringue.</p> <p>At higher temperatures a chemical reaction known as the <a href="https://theconversation.com/kitchen-science-from-sizzling-brisket-to-fresh-baked-bread-the-chemical-reaction-that-makes-our-favourite-foods-taste-so-good-58577">Maillard reaction</a> takes place in which proteins and sugars react to form new flavourful compounds. We can thank the Maillard reaction for many delicious foods including <a href="https://theconversation.com/brewing-a-great-cup-of-coffee-depends-on-chemistry-and-physics-84473">roasted coffee</a>, toast and <a href="https://theconversation.com/what-makes-smoky-charred-barbecue-taste-so-good-the-chemistry-of-cooking-over-an-open-flame-184206">seared steak</a>.</p> <p>However, excessive Maillard reactions are undesirable for a pavlova. An oven that’s too hot will turn your meringue brown and give it a “caramelised” flavour. Recipes calling for pavlova to be left in the oven overnight may actually overcook it.</p> <p>At the same time, you don’t want to accidentally undercook your pavlova – especially since uncooked eggs are often responsible for <a href="https://theconversation.com/how-to-avoid-food-borne-illness-a-nutritionist-explains-153185">food poisoning</a>. To kill dangerous bacteria, including salmonella, the pavlova’s spongy centre must reach <a href="https://foodsafety.asn.au/eggs/">temperatures above 72°C</a>.</p> <p>An alternative is to use pasteurised egg whites, which are briefly heated to a very high temperature to kill any pathogens. But this processing may also affect the egg white’s whippability.</p> <h2>Substitute ingredients</h2> <p>People love pavlova, and nobody should have to miss out. Luckily they don’t have to.</p> <p>If you want to <a href="https://theconversation.com/a-taste-for-sweet-an-anthropologist-explains-the-evolutionary-origins-of-why-youre-programmed-to-love-sugar-173197">limit your sugar intake</a>, you can make your meringue using sweeteners such as <a href="https://theconversation.com/whats-the-difference-between-sugar-other-natural-sweeteners-and-artificial-sweeteners-a-food-chemist-explains-sweet-science-172571">powdered erythritol or monk fruit</a>. But, if you do, you may want to add some extra stabiliser such as cornflour, arrowroot starch, or a pinch of xanthan gum to maintain the classic texture.</p> <p>Also, if you want a vegan pavlova, you can turn to the chickpea instead of the chicken! <a href="https://review.jove.com/t/56305/composition-properties-aquafaba-water-recovered-from-commercially">Aquafaba</a> – the water collected from tinned or soaked beans – contains proteins and carbohydrates that give it emulsifying, foaming and even thickening properties. Egg-free pavlova recipes typically replace one egg white with about two tablespoons of aquafaba.</p> <p>And for those of you who don’t do gluten, pavlova can easily be made <a href="https://theconversation.com/gluten-free-diet-is-expensive-socially-challenging-for-those-with-celiac-disease-and-wheat-allergy-155861">gluten-free</a> by using certain stabilising agents.</p> <p>All that’s left is to get creative with your toppings and decide what to do with those leftover yolks!<img style="border: none !important; box-shadow: none !important; margin: 0 !important; max-height: 1px !important; max-width: 1px !important; min-height: 1px !important; min-width: 1px !important; opacity: 0 !important; outline: none !important; padding: 0 !important;" src="https://counter.theconversation.com/content/196485/count.gif?distributor=republish-lightbox-basic" alt="The Conversation" width="1" height="1" /></p> <p><a href="https://theconversation.com/profiles/nathan-kilah-599082"><em>Nathan Kilah</em></a><em>, Senior Lecturer in Chemistry, <a href="https://theconversation.com/institutions/university-of-tasmania-888">University of Tasmania</a> and <a href="https://theconversation.com/profiles/chloe-taylor-1400788">Chloe Taylor</a>, Research Fellow - PhD candidate, <a href="https://theconversation.com/institutions/university-of-tasmania-888">University of Tasmania</a></em></p> <p><em>Image credits: Getty Images</em></p> <p><em>This article is republished from <a href="https://theconversation.com">The Conversation</a> under a Creative Commons license. Read the <a href="https://theconversation.com/how-to-make-the-perfect-pavlova-according-to-chemistry-experts-196485">original article</a>.</em></p>

Food & Wine

Placeholder Content Image

Coconut strawberry jam drops

<p>These strawberry jam droplets are like the perfect, golden biscuit, filled with the perfect sweet treat. The coconut gives these traditional sugary snacks the richness they’ve been missing.</p> <p><strong><span style="text-decoration: underline;">Serves:</span> </strong>32 biscuits</p> <p><strong><span style="text-decoration: underline;">Ingredients:</span></strong></p> <ul> <li>125g butter, chopped, at room temperature</li> <li>⅔ cup caster sugar</li> <li>1 teaspoon maple syrup</li> <li>1 egg yolk</li> <li>1 ¼ cups self-rising flour, sifted</li> <li>⅔ cup desiccated coconut</li> <li>⅓ cup strawberry jam</li> </ul> <p><strong><span style="text-decoration: underline;">Method:</span></strong></p> <ol> <li>Preheat oven to 180°C. Line two large flat baking trays with non-stick baking paper.</li> <li>Using an electric mixer, cream the butter, sugar and vanilla essence in a mixing bowl until pale and creamy. Add the egg yolk and mix well. Add the flour and coconut, and mix on low speed until just combined.</li> <li>Using a heaped teaspoon of mixture, roll into balls. Place onto baking trays, allowing room for spreading. Flatten slightly with a spatula. Using the end of round handled wooden spoon, make an indentation in the centre of each biscuit. Fill the hole with a 1/4 teaspoon of jam.</li> <li>Bake 1 tray at a time for 12-15 minutes or until light golden. Stand for 5 minutes on tray before transferring to a wire rack to cool.</li> </ol> <p><em>Images: Shutterstock</em></p>

Food & Wine

Placeholder Content Image

Lemon curd and cream sponge cake

<p>Not only is this cake beautiful, but homemade lemon curd and cream sandwiched between lovely sponge cakes, it will exceed all expectations.</p> <p><strong><span style="text-decoration: underline;">Serves:</span> </strong>12</p> <p><strong><span style="text-decoration: underline;">Ingredients:</span></strong></p> <ul> <li>350g butter, softened, plus extra for greasing <ul> <li>350g caster sugar</li> <li>4 lemons, zest only, plus juice of 2 lemons</li> <li>3 large pieces candied lemon peel, finely chopped</li> <li>6 free-range eggs</li> <li>3 teaspoon baking powder</li> <li>300g self-raising flour</li> <li>50g cornflour</li> </ul> </li> </ul> <p><em>Lemon curd</em></p> <ul> <li>60g butter</li> <li>225g caster sugar</li> <li>3 lemons, juice and zest</li> <li>2 free-range eggs</li> </ul> <p><em>Cream</em></p> <ul> <li>300ml double cream</li> <li>200g icing sugar, sifted, plus extra for dusting</li> </ul> <p><strong><span style="text-decoration: underline;">Method:</span></strong></p> <p>1. Preheat the oven to 180°C. Grease and line two cake tins.</p> <p>2. In a bowl, cream the butter and sugar until pale and fluffy. Add the lemon zest and juice and candied peel.</p> <p>3. Slowly beat in the eggs, one at a time, until the mixture is well combined.</p> <p>4. Sift the baking powder, self-raising flour and corn flour together in a bowl and fold into the cake mixture.</p> <p>5. Divide the cake mixture evenly between the two cake tins and bake for 25 to 30 minutes or until risen and golden-brown. Remove from the oven and set aside to cool for 10 minutes. Run a round-bladed knife around the inside edge of the tins to loosen the cakes. Remove the cakes from the tins and set aside to cool completely on a rack.</p> <p>6. Meanwhile, to make the lemon curd heat the butter, sugar and lemon juice and zest in a bowl set over a pan of simmering water, stirring occasionally until the butter has melted and the sugar has dissolved. Be sure not allow the base of the bowl to touch the surface of the water. Remove from the heat.</p> <p>7. Meanwhile, beat the eggs in a separate bowl. Slowly whisk the melted butter mixture into the beaten eggs until well combined.</p> <p>8. Set the bowl over the pan of simmering water and cook, whisking constantly, for two to three minutes or until the mixture thickens enough to coat the back of a spoon.</p> <p>9. Sieve the lemon curd into a clean bowl, then cover with cling film and set aside to cool.</p> <p>10. For the cream, whip the cream and icing sugar together in a bowl until soft peaks form when the whisk is removed.</p> <p>11. Place one of the cakes onto a serving plate and spread with the lemon curd. Spread over some of the whipped cream and sandwich with another cake. Drizzle the top of cake with lemon curd and let it run over the edges.</p> <p><em>Images: Shutterstock</em></p>

Food & Wine

Placeholder Content Image

Apple and pear strudel

<p>This moist, delicious apple and pear strudel makes a warming winter dessert, and is a fantastic recipe to try in the kitchen with your grandchildren.</p> <p><span style="text-decoration: underline;"><strong>Ingredients</strong>:</span></p> <ul> <li>Granny smith apple</li> <li>Pear</li> <li>65g seedless raisins</li> <li>55g walnut halves</li> <li>1 1/2 teaspoons ground cinnamon</li> <li>70g caster sugar</li> <li>5 sheets of filo pastry</li> <li>2 tablespoons vegetable oil</li> <li>Icing sugar, to dust</li> </ul> <p><span style="text-decoration: underline;"><strong>Method</strong>:</span></p> <ol> <li>To begin, preheat oven to 220°C then prepare the fruit by peeling and coring the apple and pears, then coarsely chop them along with the seedless raisins and walnut halves.</li> <li>Combine the fruit and walnuts in a medium bowl with the cinnamon and caster sugar.</li> <li>Place the filo sheets on a clean work surface.</li> <li>Cover the filo sheets with a dry tea towel than a damp tea towel to prevent from drying out.</li> <li>Brush one of the filo sheets with a little oil, then top with another sheet and brush with oil.</li> <li>Continue this layering process with the remaining filo sheets.</li> <li>Spoon the fruit mixture on the short edge of the filo, leaving a 4cm border.</li> <li>Fold in the ends and roll up to enclose, then brush with oil and place on baking tray.</li> <li>Bake on top shelf of oven for 15 minutes or until golden brown.</li> <li>Dust with icing sugar, cut into equal slices and serve.</li> </ol> <p><em>Images: Shutterstock</em></p>

Food & Wine

Placeholder Content Image

Delicious and easy decadent double chocolate mousse cake

<p class="css-1316j2p-StyledParagraph e4e0a020">Image: Instagram </p> <p class="css-1316j2p-StyledParagraph e4e0a020">The<span> </span><em>delicious.</em><span> </span>team have released a new range of baking mixes including Double Choc Mousse Cake, Cookies &amp; Cream Cake, Salted Choc-Chip Cookie Pie and Upside Down Golden Syrup Banana Cake.</p> <p class="css-1316j2p-StyledParagraph e4e0a020">For all the information about the new range of<span> </span><em>delicious.</em><span> </span>cake mixes you can visit<span> </span><a rel="noopener" href="https://www.delicious.com.au/bakingrange" target="_blank" class="css-1h8ruiq-StyledTextLink ezegcyi0" data-link-type="article-inline">delicious.com.au/bakingrange</a></p> <p class="css-1316j2p-StyledParagraph e4e0a020"><strong>DOUBLE CHOC MOUSSE CAKE WITH WHIPPED VANILLA MASCARPONE AND COFFEE SYRUP</strong></p> <p class="css-1316j2p-StyledParagraph e4e0a020">Serves: 12</p> <p class="css-1316j2p-StyledParagraph e4e0a020"><strong>INGREDIENTS</strong></p> <p class="css-1316j2p-StyledParagraph e4e0a020"><strong>DOUBLE CHOC MOUSSE CAKE BASE RECIPE</strong></p> <p class="css-1316j2p-StyledParagraph e4e0a020">1 x packet delicious. double choc mousse baking mix</p> <p class="css-1316j2p-StyledParagraph e4e0a020">80g unsalted butter, melted</p> <p class="css-1316j2p-StyledParagraph e4e0a020">2 large eggs</p> <p class="css-1316j2p-StyledParagraph e4e0a020">2 1/3 cups (580ml) cold full cream milk</p> <p class="css-1316j2p-StyledParagraph e4e0a020">150ml cold thickened cream</p> <p class="css-1316j2p-StyledParagraph e4e0a020"><strong>CHOCOLATE SHARDS</strong></p> <p class="css-1316j2p-StyledParagraph e4e0a020">100g dark chocolate, chopped</p> <p class="css-1316j2p-StyledParagraph e4e0a020"><strong>WHIPPED VANILLA MASCARPONE</strong></p> <p class="css-1316j2p-StyledParagraph e4e0a020">1/2 cup (125g) mascarpone</p> <p class="css-1316j2p-StyledParagraph e4e0a020">1/2 cup (80g) pure icing sugar, sifted</p> <p class="css-1316j2p-StyledParagraph e4e0a020">2 tsp vanilla bean paste</p> <p class="css-1316j2p-StyledParagraph e4e0a020">1 1/2 cup (375ml) thickened cream</p> <p class="css-1316j2p-StyledParagraph e4e0a020"><strong>COFFEE SYRUP</strong></p> <p class="css-1316j2p-StyledParagraph e4e0a020">3/4 cup (165g) caster sugar</p> <p class="css-1316j2p-StyledParagraph e4e0a020">3/4 cup (180ml) strong coffee</p> <p class="css-1316j2p-StyledParagraph e4e0a020">1 tsp vanilla bean paste</p> <p class="css-1316j2p-StyledParagraph e4e0a020"><strong>METHOD</strong></p> <p class="css-1316j2p-StyledParagraph e4e0a020">1. Prepare the double choc mousse cake base recipe according to packet instructions. Set aside.</p> <p class="css-1316j2p-StyledParagraph e4e0a020">2. Place the dark chocolate in a heatproof bowl set over a small saucepan of barely simmering water. Stir until melted, then remove from heat. Pour the chocolate over a large sheet of baking paper and, using a spatula, spread until very thin. Place another sheet of baking paper over the top and flatten. Starting at the short end of the paper, roll into a cylinder. Place in the fridge to set for 30 minutes or until cold and set. Unroll by pulling the two sheets of paper apart to create chocolate shards. Keep refrigerated until ready to serve.</p> <p class="css-1316j2p-StyledParagraph e4e0a020">3. Meanwhile, for the coffee syrup, place sugar, coffee and vanilla in a small saucepan over medium heat. Bring to a simmer and cook for 7-8 minutes until reduced and slightly syrupy. Remove from heat and allow to cool completely.</p> <p class="css-1316j2p-StyledParagraph e4e0a020">4. For the vanilla mascarpone, place mascarpone, icing sugar, vanilla and cream in the bowl of a stand mixer fitted with the whisk attachment and whisk until firm peaks begin to form.</p> <p class="css-1316j2p-StyledParagraph e4e0a020">5. To serve, remove mousse cake from the pan and place on a serving plate. Top with the vanilla mascarpone and drizzle over the cooled coffee syrup. Top with chocolate shards and serve immediately.</p>

Food & Wine

Placeholder Content Image

Try this healthy blueberry chocolate cake

<p>A healthy diet does not have to be boring. This indulgent cake is paleo-friendly, meaning that it is free from refined sugar, grains and dairy products. Perfect for the whole family!</p> <p><em>Serves 10-12</em></p> <p><span style="text-decoration: underline;"><strong>Ingredients</strong></span></p> <p><strong>Base</strong></p> <ul> <li>1 cup unsweetened shredded coconut</li> <li>1 cup raw walnuts</li> <li>¼ raw cacao powder</li> <li>2 tbs. coconut oil</li> <li>1 tbs. raw honey (or rice malt syrup)</li> </ul> <p><strong>Filling</strong></p> <ul> <li>2 cups raw cashews (soaked overnight – if you don’t it will still work, just won’t be as smooth!)</li> <li>1 cup coconut milk</li> <li>1 cup blueberries (fresh or thawed frozen)</li> <li>1/3 cup coconut oil</li> <li>1 tbs. raw honey</li> <li>1 tsp. 100% vanilla extract</li> </ul> <p><strong>Topping</strong></p> <ul> <li>1 cup fresh blueberries</li> <li>¾ cup raw cashews crushed</li> <li>1 tbs. coconut sugar</li> <li>1 tbs. ghee or coconut oil</li> <li>½ a batch of paleo chocolate (recipe available here)</li> </ul> <p><strong>Method</strong></p> <p>1. Line the base of a 20 cm spring form cake tin with baking paper and grease the edges with a little coconut oil.</p> <p>2. Start with the base. In a food processor (we use our Vitamix), place the walnuts, coconut and raw cacao powder. Whiz these ingredients until a fine meal forms.</p> <p>3. Add the coconut oil and raw honey and whiz until it becomes a choc butter.</p> <p>4. Once it’s all combined, press the base in to the cake tin, making sure you press it out evenly, covering the entire base.</p> <p>5. Place in the freezer.</p> <p>6. Now for the filling: Drain and rinse the cashews and place them in to the food processor along with the coconut milk, blueberries, coconut oil, raw honey and vanilla extract.</p> <p>7. Whiz until completely smooth, this will take around 5 minutes.</p> <p>8. Take the base out of the freezer and pour the filling on top of the base.</p> <p>9. Shake the tin to even out the top and place the cake in to the freezer for around 1 ½ hours or until set.</p> <p>10. Take the cake out of the freezer and let sit for 10 minutes.</p> <p>11. Meanwhile, time for the toppings! You'll need to make a ½ batch of paleo chocolate the place the crushed cashews, coconut sugar and ghee in a medium saucepan on medium heat.</p> <p>12. Stir continuously until the ghee is melted and the cashews have caramelised. Transfer these on to a plate and allow to cool.</p> <p>13. Rub the outside of the cake tin with a hot cloth and release the spring form slowly (you may need to run a knife around the edge).</p> <p>14. Top the cake with fresh blueberries, caramelised cashews and drizzle with paleo chocolate. Cut in to slices with a hot knife and store any left overs in an airtight container in the fridge or freezer.</p> <p><em>Republished with permission of <a rel="noopener" href="https://www.wyza.com.au/articles/recipes/choc-blueberry-cake" target="_blank">Wyza.com.au.</a></em></p> <p> </p>

Food & Wine

Placeholder Content Image

Whip up some puff pastry pear tarts

<p>Almond frangipane is a classic French preparation that can be made in moments. It provides a delicious base for raw or poached fruit and is spread over uncooked pastry to make simple tarts. It can be made in advance and stored in an airtight container in the refrigerator, then softened at room temperature or in the microwave in less than a minute.</p> <p>This recipe uses ground almonds, but it can be made with ground hazelnuts or walnuts. A fun variation is to leave the poached fruit halves whole and to cut pastry shapes to echo the shape of the fruit being used, thus making individual pear tarts or even peach or plum tarts. Each pastry shape must be chilled well before baking to prevent shrinking.</p> <p><strong>Serves:</strong> 6</p> <p><strong>Ingredients</strong></p> <div class="article-body"> <ul> <li>1 roll ready-made all-butter puff pastry (such as Carême), thawed overnight in the refrigerator or at room temperature for 1 hour, then rolled into a 25cm-square sheet</li> <li>1 free-range egg yolk</li> <li>3–6 (depending on size) whole poached pears (see page 29), halved</li> <li>2 tablespoons reduced poaching syrup double cream or ice cream, to serve</li> </ul> <p><strong>Almond frangipane</strong></p> <ul> <li>80g unsalted butter, softened</li> <li>80g caster sugar</li> <li>80g ground almonds</li> <li>2 teaspoons plain flour</li> <li>1 free-range egg yolk</li> </ul> <p><strong>Directions</strong></p> <ol> <li>To make the almond frangipane, cream butter and sugar in a food processor until light and creamy. Add the ground almonds and flour and pulse briefly. Add egg yolk and mix just until you have a smooth cream. Scrape into a bowl until needed.</li> <li>Lift pastry sheet onto a baking paper-lined baking tray. Lightly mix the other egg yolk with a fork and brush it all over pastry with a pastry brush, ensuring that no egg drips over the edges (this will impede rising). If making a rectangular tart, score a 1 cm border around edges and prick centre with a fork. Chill in the refrigerator for 20 minutes.</li> <li>Spread chilled pastry with a 5mm thick layer of frangipane inside the scored border. (If using drained fruit halves for individual tarts, place a spoonful of frangipane on the pastry where the hollow of the fruit will cover it.)</li> <li>Preheat oven to 210°C. Cut fruit into thick wedges, then lightly press into frangipane, arranging them in closely packed and slightly overlapping rows. (For individual tarts, place halves over spoonfuls of frangipane.) Brush fruit with a little reserved syrup. Chill in refrigerator for 15 minutes.</li> <li>Bake for 20 minutes, then reduce heat to 170°C and cook for another 20 minutes. (Bake individual tarts for 15 minutes at 210°C and 15 minutes at 170°C.) Carefully paint fruit once again with reserved syrup.</li> <li>Bake for another 5 minutes; pastry should be the colour of toast so that it is really crisp and crunchy. Cool tart/s on a cake cooling rack before slicing with a serrated knife, if necessary (use a sawing action rather than pressing through the pastry). Serve with double cream or ice cream.</li> </ol> <p><a rel="noopener" href="http://t.dgm-au.com/c/185116/69171/1880?u=http%3A%2F%2Fwww.booktopia.com.au%2Fkitchen-garden-companion-cooking-stephanie-alexander%2Fprod9781921384349.html" target="_blank"><em>Recipe and image from<span> </span></em><span>Kitchen Garden Companion - Cooking</span><em> by Stephanie Alexander, Penguin Books, RRP $49.99.</em></a><br /><br /><em>Photography: © Simon Griffiths, Mark Chew.</em></p> <p><em>Republished with permission of <a href="https://www.wyza.com.au/recipes/puff-pastry-pear-tarts.aspx">Wyza.com.au</a>.</em></p> </div>

Food & Wine

Placeholder Content Image

Try this for a sweet delight: Chocolate mousse cake with poached pears and crème fraîche

<p><strong>Time to prepare 30 mins + Overnight refrigeration, Cooking time 1h 40 mins | Serves 8</strong></p> <p>This melt-in-your-mouth mousse cake is beautifully garnished. It's the perfect sweet treat with the one you love.</p> <p><em>Recipe from </em><a href="http://t.dgm-au.com/c/185116/71095/1880?u=http%3A%2F%2Fwww.booktopia.com.au%2Fmkr-order-now-for-your-chance-to-win--seven-network-operations-ltd%2Fprod9780733634758.html"><em>MKR: Best of the Best Cookbook</em></a><em> (RRP $39.99), published by Hachette Australia. </em><a href="http://t.dgm-au.com/c/185116/71095/1880?u=http%3A%2F%2Fwww.booktopia.com.au%2Fmkr-order-now-for-your-chance-to-win--seven-network-operations-ltd%2Fprod9780733634758.html"><strong>Get 70% off</strong>*</a><a href="http://t.dgm-au.com/c/185116/71095/1880?u=http%3A%2F%2Fwww.booktopia.com.au%2Fmkr-order-now-for-your-chance-to-win--seven-network-operations-ltd%2Fprod9780733634758.html"><strong> the RRP - Order here</strong></a><strong><u>.</u></strong></p> <p><strong>Ingredients </strong></p> <ul> <li>340g dark chocolate, broken into small pieces</li> <li>225g unsalted butter, softened</li> <li>5 eggs</li> <li>340g caster sugar</li> <li>Crème fraîche, to serve</li> <li>½ teaspoon black salt, to garnish</li> <li>Extra cocoa, for dusting</li> <li>Mint leaves, to garnish</li> </ul> <p><strong>Poached pears</strong></p> <ul> <li>4 Beurre Bosc pears, peeled, cored and halved</li> <li>1 cinnamon stick, broken into pieces</li> <li>100g brown sugar</li> </ul> <p><strong>Directions</strong></p> <p>1. Preheat the oven to 180°C. To prepare the pears, place in a small casserole dish and add the cinnamon, sugar and enough boiling water to cover the pears. Cover with foil and cook in the oven for about 40 minutes or until very tender. Remove the pears and set aside to cool. Refrigerate, covered, until required.</p> <p>2. To prepare the cake, preheat the oven to 160°C. Grease a 22cm round springform tin and line the base and sides with baking paper.</p> <p>3. Melt the chocolate and butter in a medium heatproof bowl over a saucepan of simmering water, stirring to combine. Remove from the heat and cool for 10 minutes.</p> <p>4. Whisk together the eggs and sugar until pale and creamy. Fold half the cooled chocolate mixture into the egg and sugar mixture, then repeat with the remaining batch.</p> <p>5. Pour the mixture into the prepared tin. Place in a roasting pan and add enough boiling water to come halfway up the sides of the cake pan. Cook in the centre of the oven for 55 minutes. Remove the cake pan from the roasting dish, set aside to cool and refrigerate overnight.</p> <p>6. To serve, remove the outer ring of the pan and cut the cake into generous slices. Place each slice on a serving plate, spoon over a generous amount of crème fraîche and garnish with black salt. Place a pear half beside each slice of cake, dust over a little cocoa and garnish with fresh mint.</p> <p><strong>Tips</strong></p> <p>If black salt is unavailable, try garnishing the crème fraîche with a little grated chocolate.</p> <p><em>Republished with permission of </em><a href="https://www.wyza.com.au/recipes/chocolate-mousse-cake-with-poached-pears-and-creme-fraiche.aspx"><em>Wyza.com.au.</em></a></p>

Food & Wine

Placeholder Content Image

Lyndey Milan’s chocolate pretzel and marshmallow slice

<p>Home cook hero Lyndey Milan shares a wickedly delicious chocolate pretzel slice recipe.</p> <p><strong>Ingredients</strong></p> <ul> <li>250g shortbread biscuits</li> <li>100g salted butter, melted</li> <li>250g dark chocolate bits (chips)</li> <li>150g marshmallows, halved</li> <li>75g mini pretzels</li> <li>250g pecans, walnuts or macadamias, roughly chopped</li> <li>100g milk chocolate buttons, roughly chopped</li> <li>100g white chocolate bits (chips)</li> <li>395g can condensed milk</li> <li>2 teaspoons salt flakes (optional)</li> <li>125g dark chocolate (melted)</li> </ul> <p><strong>Method</strong></p> <ol> <li>Preheat oven to moderate, 180°C (160°C fan-forced). Line a <a href="http://lyndeymilan.com/bakeware-range/">33 x 24 x 4.5 baking tray </a>with baking paper.</li> <li>Crush biscuits in a food processor until fine, add butter, just long enough to combine. Press over base of tin and push down. Scatter over dark chocolate chips, marshmallows, pretzels and pecans.</li> <li>Sprinkle with the chopped milk buttons and white chocolate bits. Drizzle condensed milk over top. Sprinkle with salt flakes if desired.</li> <li>Bake for 25-30 minutes or until the slice is mostly firm. If the top is browning too quickly cover loosely with a sheet of foil.</li> <li>Leave to cool completely or refrigerate. Cut into small squares or slices to serve. Before serving melt dark chocolate in a snap lock bag in a bowl filled with hot water, snip corner and drizzle melted chocolate over slices.</li> </ol> <p><strong>Tips</strong></p> <p>Most slices take time, preparing the different layers and cooking and preparing different layers. This one doesn’t but it is very, very rich. Don’t even think about using skim condensed milk.</p> <p><em>Recipe from <a href="http://lyndeymilan.com/">Lyndey Milan</a>. As seen in Episode 4 in Lyndey Milan's Easy Summer Baking Secrets. More recipes at <a href="http://lyndeymilan.com/">www.lyndeymilan.com</a>.</em></p> <p><em>Republished with permission of <a href="https://www.wyza.com.au/recipes/lyndey-milan-chocolate-pretzel-marshmallow-slice.aspx">Wyza</a>.</em></p>

Food & Wine

Placeholder Content Image

Decadent blackberry, yogurt and pistachio cake

<p>Make the best of the fresh blackberry season with this delicious, zesty cake.</p> <p><strong>Ingredients:</strong></p> <ul> <li>1/3 cup (45g) pistachios</li> <li>250g butter, softened</li> <li>1 lemon, finely zested</li> <li>1 cup (220g) caster sugar</li> <li>3 eggs</li> <li>2 ½ cups (375g) self-raising flour</li> <li>½ cup (40g) shredded coconut</li> <li>1 cup (250g) Greek style yogurt</li> <li>200g blackberries</li> <li>2 tablespoons brown sugar</li> <li>2 tablespoons pistachios, roughly chopped</li> <li>Extra blackberries, to serve</li> <li>Double cream, to serve</li> </ul> <p><strong>Method:</strong></p> <ol> <li>Preheat oven to 180°C (160°C fan-forced). Grease a deep 22cm round cake tin, line base with baking paper.</li> <li>Place pistachios in a food processor and pulse until ground, set aside. Place butter, zest and sugar in a bowl and beat with an electric mixer until pale and fluffy. Add eggs one by one, beating well in between additions. If mixture splits slightly, add a little of the flour to recombine.</li> <li>Using a wooden spoon, stir in the ground pistachio, flour, coconut and yogurt. Fold through ½ the berries. Spoon mixture into prepared pan, spread evenly with a plastic spatula.</li> <li>Scatter remaining berries, sugar and pistachios on top. Bake uncovered for about 50–60 minutes or until golden and firm to touch and a skewer inserted in the centre comes out clean. Stand for 5 minutes in tin then transfer to a cooling rack.</li> <li>Serve cake warm or at room temperature with double cream and extra fresh blackberries.</li> </ol> <p><em>Recipe from Fresh Aussie Raspberries and Blackberries – </em><a href="http://freshberries.com.au/"><em>freshberries.com.au</em></a></p> <p><em>Republished with permission of </em><a href="https://www.wyza.com.au/recipes/blackberry-yogurt-and-pistachio-cake.aspx"><em>Wyza</em></a><em>.</em></p>

Food & Wine

Placeholder Content Image

Maggie Beer's fresh raspberry cake

<p>One of Australia's most loved foodies, Maggie Beer, shares her recipe for a delicious raspberry cake.</p> <p><strong>Ingredients:</strong></p> <ul> <li>2 2/3 cup plain flour</li> <li>1 tsp baking powder</li> <li>½ tsp sea salt</li> <li>¼ tsp baking soda</li> <li>1 cup unsalted butter</li> <li>1 ¾ cup sugar</li> <li>1 tsp pure vanilla extract</li> <li>4 eggs</li> <li>½ cup buttermilk</li> <li>2 cup fresh raspberries</li> </ul> <p><strong>Syrup</strong></p> <ul> <li>1 cup Sangiovese Verjuice</li> <li>¼ cup sugar</li> </ul> <p><strong>Method:</strong></p> <ol> <li>Preheat the oven to 180C. Prepare a 20cm cake pan with vegetable-oil cooking spray and parchment paper.</li> <li>Sift together flour, baking powder, salt, and baking soda in a large bowl and set aside.</li> <li>Put the butter and the sugar in the bowl of an electric mixer fitted with the paddle attachment and beat until light and fluffy. Add the vanilla extract. Beat in the eggs one at a time, incorporating each egg completely before adding the next. Incorporate the dry ingredients and the buttermilk, alternating between each, in two additions. Fold in the raspberries and pour into the prepared cake pan. Bake for 30 – 40 minutes.</li> <li>To make the syrup, combine the Sangiovese Verjuice and ¼ cup of sugar and heat to boiling point in a small sauce pan. Continue to simmer until the syrup is reduced to a consistency that coats the back of a spoon. Take off the heat and cool slightly before spooning over the top of the whole cake or drizzle over individual pieces of cake once they have been cut. Serve with thick cream.</li> </ol> <p><em>Republished with permission of </em><a href="https://www.wyza.com.au/recipes/maggie-beer-fresh-raspberry-cake.aspx"><em>Wyza</em></a><em>.</em></p>

Food & Wine