Placeholder Content Image

Expert laundry tips you’ll wish you knew sooner

<p>Keep your clothes cleaner, your home greener and your electricity bill low with these expert laundry tips.</p> <p>By Anna-Kaisa Walker, <em>Reader’s Digest Canada</em></p> <p><strong>Go scent free</strong></p> <p>A 2011 study found that fragranced products cause dryer vents to emit seven compounds that contain hazardous air pollutants and two that are carcinogenic.</p> <p><strong>Choose products wisely</strong></p> <p>Even “unscented” brands may not be what they purport to be. “Unscented detergents can still contain fragrances to mask chemical smells,” says Lindsay Coulter, the David Suzuki Foundation’s green-living expert.</p> <p><strong>Try your hand at DIY</strong></p> <p>If you want to avoid mystery ingredients, make your own detergent. The David Suzuki Foundation recommends using ½ cup per load of a mixture of two teaspoons of salt, two tablespoons of baking soda, two tablespoons of liquid Castile soap and one litre of hot water.</p> <p><strong>Nix the essential oils</strong></p> <p>Don’t scent homemade detergent with essential oils. Some dryers heat up to about 57˚C, which is above the flashpoint for some essential oils.</p> <p><strong>A little vinegar goes a long way</strong></p> <p>If your towels are musty, add a cup of white vinegar or a cup of baking soda to your wash load (but not both at once).</p> <p><strong>Watch out for microfibres</strong></p> <p>Your fleece jacket made from recycled bottles likely contains microfibres – pollutants that account for 35 per cent of microplastics in the world’s oceans. “With every wash, your garments are shedding microfibres that end up in waterways and eventually in the food chain,” says Coulter. Special fibre-trapping bags can help keep them out of the drain.</p> <p><strong>You don’t always need chlorine</strong></p> <p>Instead of using chlorine bleach, disinfect your clothes by line drying. Sunlight’s ultraviolet rays are effective at killing bacteria in fabrics. Bonus: they’re free.</p> <p><strong>Don’t overuse detergent</strong></p> <p>Using more detergent won’t make clothes cleaner. Over time, excess detergent can build up and cause smelly residue inside your machine. Use the least amount of detergent possible – start with half the recommended amount, and if your clothes still come out clean, you can try reducing even further.</p> <p><strong>Clean your lint tray</strong></p> <p>Lint buildup in the filter and vents is a primary cause of the dozens of fires started by dryers every year in Toronto, says Papeo. “Empty your lint tray before every load and vacuum the filter and inside the trap from time to time.”</p> <p><strong>Your socks really are going missing</strong></p> <p>The real “sock monster” responsible for your missing hosiery? Your washing machine. Small items can slip past the rubber gasket on a front-loading washer, and get trapped underneath the drum. If you’re suspicious, get a pro to investigate, and wash all your socks in a mesh bag to prevent disappearances.</p> <p><em>Photos: Reader’s Digest</em></p> <p><em>This article originally appeared on <a href="mailto:https://www.readersdigest.com.au/culture/expert-laundry-tips-youll-wish-you-knew-sooner">Reader’s Digest</a></em></p> <p><em> </em></p> <p><em> </em></p>

Home & Garden

Placeholder Content Image

Hearty Chicken and root vegetable tray bake

<p>Healthy recipe blogger Lilian Dikmans shares her go-to meal recipe that requires minimal effort! She shares a delicious dinner bake recipe here.</p> <p>"I love tray bakes. They're versatile, require minimal effort and create minimal washing up. I'd rather stick a fork in my eye than do a mountain of dishes. They are also great if you're cooking for a crowd; just use a huge tray and add more ingredients.</p> <p>I use free-range chicken thighs (which I buy in bulk and freeze in portions) and then change up the root vegetables depending on what I have (i.e. what's in season/cheapest at the grocer). So feel free to adjust the recipe to suit what you have, keeping in mind that larger pieces of meat will require longer cooking time."</p> <p><strong>Ingredients:</strong></p> <ul> <li>4 free-range chicken thighs</li> <li>1 sweet potato</li> <li>2 small white potatoes (I used dutch cream ones)</li> <li>1/4 teaspoon chilli powder</li> <li>Sea salt</li> <li>Black pepper</li> <li>Olive oil</li> <li>Fresh parsley, to serve</li> </ul> <p><strong>Directions:</strong></p> <p>1. Preheat your oven to 180°C fan-forced. Place the chicken thighs in a large baking tray.</p> <p>2. Chop the potatoes into pieces about 3cm thick and arrange around the chicken. Drizzle everything with a good amount of olive oil and sprinkle over the chilli powder, some sea salt and cracked black pepper.</p> <p>3. Bake in the preheated oven for about 45 minutes until the chicken is cooked through and everything is browned. To serve, season with more sea salt and black pepper if required and top with torn up fresh parsley.</p> <p><strong>Tips:</strong></p> <p>I used skinless chicken thighs, but if you're using chicken with the skin on I would recommend searing the chicken skin-side down in a pan (or in the baking tray if it's flame-proof) before baking to ensure that the skin goes crispy.</p> <p><em>Republished with permission of <a href="https://www.wyza.com.au/recipes/chicken-and-root-vegetable-tray-bake-ld.aspx">Wyza.com.au.</a></em></p>

Food & Wine

Placeholder Content Image

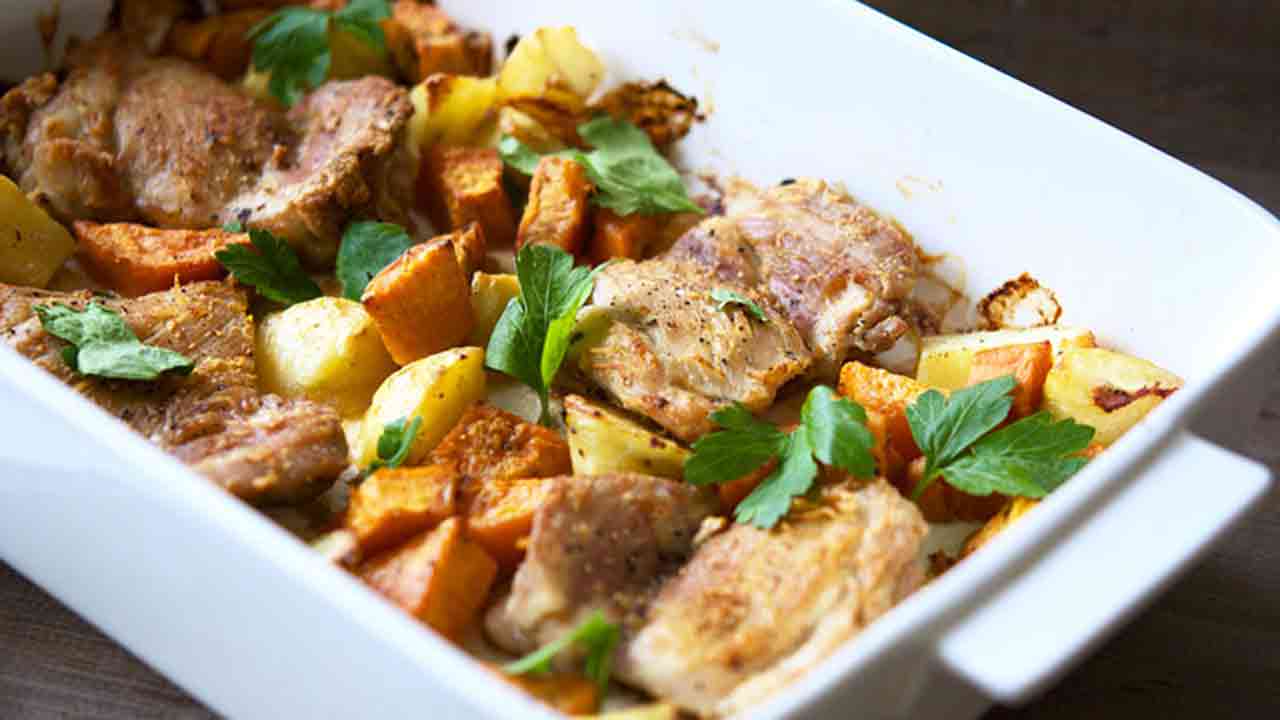
Chicken, chorizo and olive tray bake

<p>“This wonderful mid-week bake requires very little labour, yet is incredibly delicious. Sherry, a fortified wine, adds complexity and character. I use a Spanish variety but there are some great Australian options that you can find at most bottle shops. This dish is versatile and the ingredients are interchangeable. I sometimes swap the chickpeas for parboiled waxy potatoes or add different herbs, such as bay leaves and oregano, or chilli and tomatoes. A simple salad of herbs and peppery green leaves, such as rocket, works really nicely with this,” writes Justine Schofield in her latest cookbook <em>Simple Every Day.</em></p> <p><strong><span style="text-decoration: underline;">Serves</span>:</strong> 4</p> <p><strong><span style="text-decoration: underline;">Ingredients</span>:</strong></p> <ul> <li>6 boneless chicken thighs, skin on, cut in half</li> <li>1 onion, thinly sliced</li> <li>1 red capsicum, thinly sliced</li> <li>2 chorizo sausages, thinly sliced on the diagonal</li> <li>2 tablespoons extra-virgin olive oil</li> <li>salt flakes and freshly ground black pepper</li> <li>1/4 teaspoon freshly grated nutmeg</li> <li>4 garlic cloves, unpeeled and bruised</li> <li>150 g green Sicilian olives</li> <li>1 x 400 g can chickpeas, drained and rinsed</li> <li>3 rosemary sprigs</li> <li>8 cm strip of orange zest</li> <li>80 ml dry sherry (or a dry white wine, such as sauvignon blanc or chardonnay)</li> <li>125 ml chicken stock</li> </ul> <p><strong><span style="text-decoration: underline;">Method</span>:</strong></p> <ol> <li>Preheat the oven to 200°C.</li> <li>Combine the chicken, onion, capsicum and chorizo in a bowl. Drizzle over the oil and season with salt, pepper and nutmeg.  Mix well with your hands.</li> <li>Heat a large non-stick frying pan over medium–high heat and add the chicken, skin-side down. Seal on each side for 2–3 minutes until the skin is golden and crisp. Remove and place, skin-side up, in a 2 litre ovenproof baking dish. To the same pan, add the onion, capsicum and chorizo and seal for 3–4 minutes until golden. Now add to the baking dish along with the garlic, olives, chickpeas, rosemary and orange zest and arrange in an even layer.</li> <li>Drain away any excess oil from the pan and heat over high heat. Add the sherry, stir to deglaze and cook for 1 minute or until reduced by one-third. Pour the reduced sherry and the stock in and around the meat and vegetables, then bake for 35–40 minutes until golden and the pan juices have reduced. Rest for 5 minutes before serving.</li> </ol> <p><img width="146" height="191" src="https://oversixtydev.blob.core.windows.net/media/7266954/simpleeveryday_book-cover_146x191.jpg" alt="Simple Every Day _Book Cover (6)" style="float: right;"/></p> <p><em>Recipe courtesy of </em>Simple Every Day<em> by Justine Schofield (Plum, $39.99).</em></p>

Food & Wine

Placeholder Content Image

Cheesy ham and pineapple tray sliders

<p>If you are looking for a hot dinner option without the fuss, these cheesy ham and pineapple tray sliders are your answer – the perfect balance between oozing melted cheese and sweet pineapple.</p> <p><strong><span style="text-decoration: underline;">Makes:</span> </strong>6</p> <p><strong><span style="text-decoration: underline;">Ingredients:</span></strong></p> <ul> <li>6 bread rolls (you can use sourdough, multigrain or wholemeal rolls</li> <li>12 slices cheddar cheese</li> <li>300g ham off the bone, shaved</li> <li>1 small pineapple, peeled, sliced thinly and cored</li> <li>A few sprigs sage</li> <li>2 tablespoons olive oil</li> <li>Tomato sauce, to serve, optional</li> </ul> <p><strong>Tip:</strong> Fancy it up with some prosciutto instead of the ham! If you can’t find fresh sage, use one tablespoon dried sage or some coriander instead, it marries really well with pineapple.</p> <p><strong><span style="text-decoration: underline;">Method:</span></strong></p> <ol> <li>Preheat oven to 180°C (160°C fan-forced).</li> <li>Slice rolls in half across. Place bottom pieces closely together inside a baking dish or tray. Top each with ham, 2-3 thin pineapple slices, cheddar and 2-3 sage leaves per roll.</li> <li>Cover with the other half of the bun, place a sage leaf on top and brush the tops with butter.</li> <li>Place in the oven and bake for 10-12 minutes or until the tops are golden and cheese melted. Serve immediately with tomato sauce on the side.       </li> </ol> <p><em>Recipe courtesy of <a href="http://www.aussiepineapples.com.au/" target="_blank"><strong><span style="text-decoration: underline;">Australian Pineapples</span></strong></a>.</em></p> <p><em><strong>Have you ordered your copy of the Over60 cookbook, The Way Mum Made It, yet? Featuring 175 delicious tried-and-true recipes from you, the Over60 community, and your favourites that have appeared on the Over60 website, <a href="https://shop.abc.net.au/products/way-mum-made-it-pbk%20%20%20" target="_blank"><span style="text-decoration: underline;">head to the abcshop.com.au to order your copy now</span></a>.</strong></em></p>

Food & Wine

Placeholder Content Image

3 tips to clean tough stains from baking trays

<p>It may be one of your least favourite jobs but cleaning your baking trays is an unfortunate necessity. Burnt food, grease and grime can accumulate quickly on this kitchen workhorse, especially if you’re leaving it awhile between scrubbings. Sadly, a dishwasher just can’t apply the same kind of focused pressure that a manual scrubbing can. Fortunately, you can return your trays to their former glory with a little bit of elbow grease and some cleaning know-how. Here’s our top three tips for removing tough stains.</p> <ol> <li>If you’re dealing with a greasy tray or burnt and blackened food, ensure you remove any big clumps from the tray with paper towel. You don’t need to scrub, just remove as much grease or loose soot as possible.</li> <li>For a greasy tray, fill your kitchen sink with piping hot water and add a good squirt of a concentrated dishwashing liquid. Pop the tray in and soak for a couple of hours or even overnight. Once the grease has softened, use a soft sponge or cloth (for a non-stick tray) or a more robust sponge or scourer (for a regular tray) to remove remaining grease and oil. Once you’ve done the hard yards, pop into the dishwasher to remove any last traces of residue.</li> <li>For a charred tray, the best technique uses baking soda and hot water. Boil your kettle then fill the sink with the hot water. Add a cup of baking soda and wait for the bubbles to subside. Pop your tray into the sink and leave for an hour or longer. Once the crusts have softened, wipe away with a dishcloth or sponge then pop into the dishwasher for a sparkling clean tray.</li> </ol> <p>Do you have a no-fail method for cleaning crusty baking trays? Share your tips with us in the comments below.</p> <p><strong>Related links:</strong></p> <p><a href="/lifestyle/home-garden/2016/09/things-you-didnt-know-your-rice-cooker-could-do/"><strong><em><span style="text-decoration: underline;">7 things you didn’t know your rice cooker could do</span></em></strong></a></p> <p><a href="/lifestyle/home-garden/2016/10/ways-to-use-hot-glue-around-the-house/"><span style="text-decoration: underline;"><em><strong>5 genius ways to use hot glue around the house</strong></em></span></a></p> <p><a href="/lifestyle/home-garden/2016/08/easy-trick-to-whiten-yellow-pillows/"><strong><em><span style="text-decoration: underline;">The easy trick to whiten old pillows</span></em></strong></a></p>

Home & Garden

Placeholder Content Image

Trick to make stained cookware look new again

<p>Cookware looking worse for wear? Before throwing it in the bin and giving it up as impossible to clean, give one of these methods a go. You might just discover your baking sheet has some life left in it after all.</p> <p><strong><span style="text-decoration: underline;">STAINLESS STEEL COOKWARE</span></strong></p> <p>Stainless steel cookware can last forever if treated correctly. That doesn’t mean however that it’s immune from rust and dirt. Try a clean-up job with the following.</p> <p><strong><span style="text-decoration: underline;">You will need:</span></strong></p> <ul> <li>Hydrogen peroxide</li> <li>Baking soda</li> <li>Steel wool/abrasive scrubbing brush</li> </ul> <p><strong><span style="text-decoration: underline;">How to:</span></strong></p> <ol> <li>Sprinkle on a generous layer of baking soda, followed by a layer of hydrogen peroxide, then a final layer of baking soda.</li> <li>Let sit for a couple of hours (or overnight)</li> <li>Get scrubbing with your steel cool.</li> </ol> <p><strong><span style="text-decoration: underline;">TO REMOVE RUST</span></strong></p> <p><strong><span style="text-decoration: underline;">You will need:</span></strong></p> <ul> <li>Pumice cleaner</li> <li>Abrasive pad</li> <li>Oven cleaner</li> <li>Plastic wrap</li> </ul> <p><strong><span style="text-decoration: underline;">How to:</span></strong></p> <ol> <li>Sprinkle the rust with pumice cleaner.</li> <li>Use the abrasive pad to scrub away at the rust. If that works, rinse your tray and you’re done. If the stain remains, try the following:</li> <li>Spray the rust stains with oven cleaner. Wrap in plastic wrap and allow to sit overnight to heat gently.</li> <li>In the morning, unwrap the tray and place in a hot oven for 20 minutes.</li> <li>Remove bakeware and let it cool before soaking in warm, soapy water and scrubbing off any remaining rust.</li> </ol> <p><strong><span style="text-decoration: underline;">ALUMINIUM BAKEWARE</span></strong></p> <p>Aluminium cookware can be quite prone to staining. To restore it to its former glory, try using the following.</p> <p><span style="text-decoration: underline;"><strong>You will need:</strong><br /> </span></p> <ul> <li>Water</li> <li>Distilled white vinegar</li> <li>A pot</li> <li>Scrubbing pad</li> </ul> <p><strong><span style="text-decoration: underline;">How to:</span></strong></p> <ol> <li>Fill the pot with equal parts water and white vinegar.</li> <li>Bring the mix to the boil then allow it to cool to room temperature.</li> <li>Saturate the pad in the mixture and scrub the stains clean</li> <li>Rinse the bakeware with soapy water and leave to dry.</li> </ol> <p><strong><span style="text-decoration: underline;">GLASS COOKWARE</span></strong></p> <p>Glass cookware is extremely effective but can get messy very fast. To restore sparkle to your Pyrex try and following.</p> <p><strong><span style="text-decoration: underline;">You will need:</span></strong></p> <ul> <li>Baking soda</li> <li>Dish soap</li> <li>Sponge</li> </ul> <p><strong><span style="text-decoration: underline;">How to:</span></strong></p> <ol> <li>Fill the bottom of your pan/dish with baking soda followed by dish soap.</li> <li>Fill the dish with hot water and let sit for 15 minutes.</li> <li>Empty out the dish and scrub with a regular sponge.</li> </ol> <p>What is your most effective way to remove stains from cookware? Share your tips with us in the comments below.</p> <p><strong>Related links:</strong></p> <p><a href="/lifestyle/home-garden/2016/08/your-bed-sheets-could-be-making-you-sick/"><span style="text-decoration: underline;"><em><strong>Your bed sheets could be making you sick</strong></em></span></a></p> <p><a href="/lifestyle/home-garden/2016/08/how-to-clean-your-bathroom-like-a-professional/"><span style="text-decoration: underline;"><em><strong>How to clean your bathroom like a professional</strong></em></span></a></p> <p><a href="/lifestyle/home-garden/2016/08/ways-to-ripen-your-avocado-in-minutes/"><strong><em><span style="text-decoration: underline;">5 ways to ripen your avocado in minutes</span></em></strong></a></p>

Home & Garden